The 2008 Jeep Grand Cherokee serpentine belt is a vital component that keeps your engine running smoothly. It's a single, continuous belt that drives multiple accessories in your engine, such as the alternator, power steering pump, air conditioning compressor, and water pump.
When this belt wears out or breaks, these essential systems stop working, leaving you stranded. Understanding the serpentine belt diagram for your 2008 Grand Cherokee is crucial for proper maintenance, troubleshooting, and replacement.
This guide will walk you through the importance of the serpentine belt, how to read its diagram, and what to look for when inspecting or replacing it.
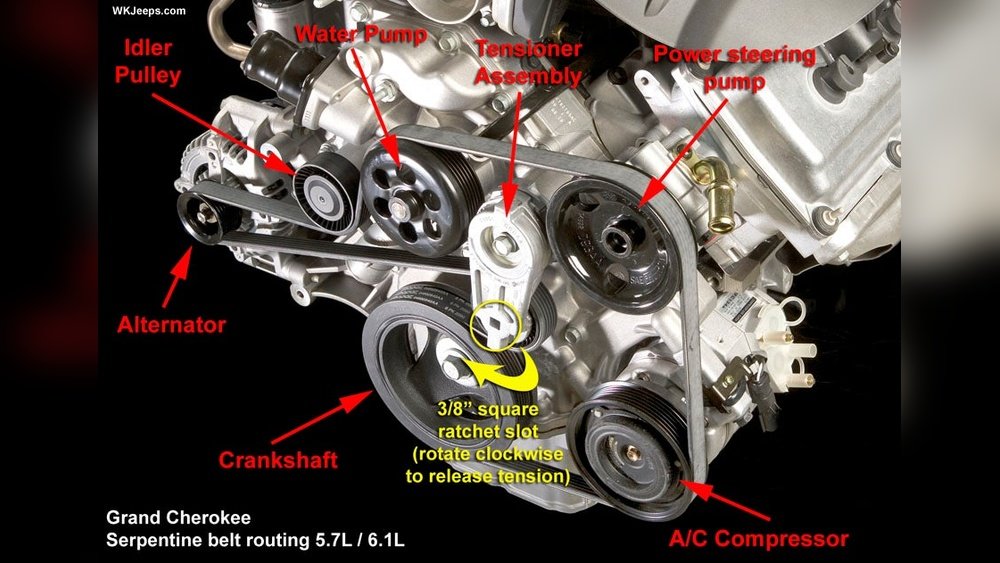
A properly functioning serpentine belt ensures that all the necessary engine components receive the power they need to operate. The alternator charges your battery, the power steering pump makes steering easier, the A/C compressor keeps you cool, and the water pump circulates coolant to prevent overheating.
Without the serpentine belt, your vehicle simply cannot function. Regular inspection and timely replacement are key to avoiding unexpected breakdowns and costly repairs.
Understanding The Serpentine Belt System
The serpentine belt system is designed as a single belt to power multiple accessories, replacing the older multi-belt systems. This design is more efficient, lighter, and takes up less space.
The belt snakes around various pulleys, each connected to an accessory.
The tensioner pulley keeps the belt at the correct tightness, ensuring it grips the pulleys effectively without slipping.
How The Serpentine Belt Works
The engine’s crankshaft, through a pulley, provides the rotational force that drives the serpentine belt. As the crankshaft spins, so does the belt. This rotational energy is then transferred to the other pulleys connected to the accessories. Each accessory pulley has grooves that match the ribs on the serpentine belt, creating a strong grip. The tensioner pulley is spring-loaded or hydraulic and automatically adjusts the belt tension as the belt stretches or components wear. This constant tension is vital for preventing slippage, which can lead to reduced performance of the accessories and premature belt wear.
Key Components Driven By The Serpentine Belt
Your 2008 Jeep Grand Cherokee’s serpentine belt is responsible for powering several critical systems:
- Alternator: This component generates electricity to charge the battery and power the vehicle’s electrical systems while the engine is running. If the alternator isn’t spinning, your battery will eventually die, and the car will stop.
- Power Steering Pump: This hydraulic pump increases the pressure in the power steering system, making it easier to turn the steering wheel, especially at low speeds. A broken belt means manual steering, which is very difficult.
- Air Conditioning (A/C) Compressor: This is the heart of your vehicle’s air conditioning system. It compresses refrigerant to cool the air inside the cabin.
- Water Pump: This pump circulates coolant through the engine and radiator, preventing the engine from overheating. A non-functional water pump can lead to severe engine damage very quickly.
- Other Accessories (depending on trim): Some models might have additional accessories driven by the belt, such as an air pump for emissions systems.
The Importance Of Belt Tension
The serpentine belt tensioner is arguably as important as the belt itself. It maintains the correct tension on the belt. If the tension is too loose, the belt can slip, causing squealing noises and reducing the efficiency of the driven accessories. If the belt slips on the alternator pulley, for example, the battery won’t charge properly. If it slips on the water pump pulley, the engine can overheat. Too much tension, though less common with automatic tensioners, can put excessive strain on the bearings of the pulleys and the belt itself, leading to premature failure.
Decoding The 2008 Jeep Grand Cherokee Serpentine Belt Diagram
A serpentine belt diagram is essentially a roadmap showing how the belt is routed around all the pulleys in the engine bay. For the 2008 Jeep Grand Cherokee, like most vehicles, there are specific routing configurations depending on the engine type (e.
g. , 3.
7L V6 or 5. 7L V8 HEMI).
It's crucial to find the correct diagram for your specific model and engine. These diagrams are often found in the vehicle's owner's manual, service manual, or can be found online from reputable auto parts stores or repair forums.
Where To Find The Diagram
- Owner’s Manual: Many owner’s manuals include a basic diagram or a description of the belt routing.
- Under the Hood: Often, a sticker with the serpentine belt routing diagram is affixed to the underside of the hood or a strut tower. This is the most convenient place to find it.
- Online Resources: Websites dedicated to Jeep repair, auto parts retailers (like AutoZone, Advance Auto Parts), and forums like JeepGarage or WKJeeps are excellent sources for diagrams. Searching for “2008 Jeep Grand Cherokee [engine size] serpentine belt diagram” will yield many results.
How To Read A Serpentine Belt Diagram
A typical diagram will show the engine's front side, with all the relevant pulleys laid out. Arrows indicate the direction of rotation for each pulley.
The belt is depicted as a continuous line snaking around these pulleys.
- Pulleys: Each pulley will be labeled with the accessory it drives (e.g., ALT for Alternator, PS for Power Steering, AC for A/C Compressor, WP for Water Pump, CRANK for Crankshaft).
- Tensioner: The tensioner pulley will also be clearly marked. Some diagrams may show it as a movable arm.
- Belt Path: The diagram illustrates the exact path the belt takes, showing which side of the belt (ribbed or smooth) contacts each pulley. This is critical for correct installation.
Pro Tip: Take a clear photo of the diagram under the hood with your smartphone before you start any work. This way, you have a digital copy readily available.
Common Variations For 2008 Grand Cherokee Engines
The 2008 Jeep Grand Cherokee was available with two primary engine options: the 3.7L V6 and the 5.7L V8 HEMI. While the basic principle of the serpentine belt remains the same, the layout and number of pulleys can differ significantly between these engines.
- 3.7L V6: This engine typically has a more straightforward pulley arrangement. You’ll find the crankshaft, alternator, power steering pump, A/C compressor, water pump, and the tensioner.
- 5.7L V8 HEMI: The V8 engine often has a slightly more complex layout, potentially including an additional idler pulley or a different arrangement of the primary accessories. The sheer size of the V8 might also affect access to certain pulleys.
It is absolutely essential to confirm which engine you have and find the corresponding diagram. Using the wrong diagram can lead to incorrect belt installation, potential damage to components, and a non-functional belt.

Credit: www.youtube.com
Inspecting Your Serpentine Belt
Regularly inspecting your serpentine belt is the best way to catch potential problems before they lead to a breakdown. Look for signs of wear and tear that indicate the belt needs replacement.
Signs Of A Worn Serpentine Belt
When you examine the belt, look for the following issues:
- Cracks: Check the ribbed side of the belt for small cracks or splits. These indicate the rubber is aging and becoming brittle. A crack that goes deep into a rib is a serious concern.
- Fraying: If the edges of the belt appear worn or are starting to fray, it’s a sign of misalignment or excessive tension.
- Glazing: The ribbed side of the belt should have a dull finish. If it appears shiny or glossy, it means the belt has been slipping, likely due to insufficient tension or contamination with oil or coolant.
- Missing Chunks: Any missing pieces or chunks from the belt indicate severe damage and the need for immediate replacement.
- Stretching: While harder to detect visually, if the belt seems loose or the tensioner is at its maximum limit, the belt may have stretched beyond its usable length.
How To Inspect The Belt
- Engine Off and Cool: Always ensure the engine is completely off and cool before touching any components under the hood.
- Locate the Belt: Find the serpentine belt and trace its path around all the pulleys.
- Use a Flashlight: A good flashlight is essential for seeing the condition of the belt, especially in darker areas of the engine bay.
- Flex the Belt: Gently bend the belt backward to inspect the ribbed side for cracks and glazing.
- Check Tension: Try to twist the belt at its longest unsupported span. It should be difficult to twist more than 90 degrees. Also, check the tensioner’s position if it’s visible.
Frequency Of Inspection
It’s recommended to inspect your serpentine belt at least twice a year or every oil change. Also, inspect it after any work is done on the engine that involves components near the belt system.
Replacing The Serpentine Belt
Replacing a serpentine belt is a common DIY maintenance task, but it requires careful attention to the routing and tension. If you’re not comfortable working on your vehicle, it’s best to have a professional mechanic do it.
Tools And Materials Needed
- New Serpentine Belt: Ensure you have the correct belt for your 2008 Grand Cherokee’s specific engine.
- Serpentine Belt Tool Kit: This is highly recommended. It includes a long-handled breaker bar and various socket adapters that fit the tensioner pulley, allowing you to release tension safely.
- Socket Set and Ratchet: For removing any covers or components if necessary.
- Gloves and Safety Glasses: For protection.
- Flashlight: For visibility.
- Diagram: The correct serpentine belt routing diagram.
Step-by-step Replacement Process
- Locate the Tensioner: Find the automatic belt tensioner. It’s usually a spring-loaded or hydraulic pulley assembly.
- Identify the Tensioner Pulley Bolt: This is the bolt that the breaker bar will engage with to pivot the tensioner.
- Attach the Breaker Bar: Fit the appropriate socket adapter onto the breaker bar and onto the tensioner pulley bolt.
- Release Tension: Slowly and carefully rotate the breaker bar to pivot the tensioner pulley away from the belt. This will release the tension on the belt, allowing you to slip it off the pulleys. Warning: Ensure the breaker bar is securely attached and you have a clear path for movement. Do not force it.
- Remove the Old Belt: Once the tension is released, carefully slip the old belt off one of the pulleys, usually the easiest one to access. Then, let the tensioner slowly return to its resting position. Remove the old belt completely.
- Route the New Belt: Refer to your diagram. Begin routing the new belt around the pulleys, starting with the crankshaft pulley and working your way around. Leave one of the easier-to-access pulleys (often the tensioner pulley itself or an idler pulley) for last.
- Apply Tension: Once the belt is routed around all pulleys except the last one, re-engage the breaker bar with the tensioner. Pivot the tensioner again to create slack.
- Install the Belt on the Last Pulley: While holding the tensioner released, slip the belt onto the final pulley.
- Release Tensioner: Slowly release the breaker bar. The tensioner will automatically apply the correct tension to the new belt.
- Double-Check Routing: Carefully inspect the entire belt path, ensuring it is correctly seated on all pulleys and that the ribbed side is against the ribbed pulleys and the smooth side against the smooth pulleys as per the diagram.
- Start the Engine: Start the engine briefly and listen for any unusual noises (like squealing) and check that all accessories are running smoothly. Turn off the engine and re-inspect the belt’s position on the pulleys.
Common Mistakes To Avoid
- Using the Wrong Belt: Always verify the part number and ensure it’s for your specific engine.
- Incorrect Routing: This is the most common mistake. Always follow the diagram precisely.
- Forcing the Belt: If the belt doesn’t seem to fit, re-check the routing and tensioner release. Never force it, as this can damage the new belt or pulleys.
- Ignoring the Tensioner: Ensure the tensioner is functioning correctly and applying adequate tension. A weak tensioner can cause the belt to slip.
- Not Checking Accessories: After installation, confirm that the alternator is charging, the power steering feels normal, and the A/C engages.

Credit: www.youtube.com
Troubleshooting Common Serpentine Belt Issues
When your serpentine belt causes problems, the symptoms are usually quite noticeable. Understanding these issues can help you diagnose the problem quickly.
Squealing Noises
A high-pitched squealing sound, especially when you first start the engine, accelerate, or turn the steering wheel, is often the first sign of a serpentine belt problem. This can be caused by:
- Loose Belt: The belt is not tight enough, causing it to slip on the pulleys. This could be due to a worn-out tensioner or an improperly installed belt.
- Glazed Belt: The belt surface has become hardened and shiny from slipping, reducing its grip.
- Contamination: Oil, coolant, or power steering fluid leaking onto the belt can cause it to slip and squeal.
- Misaligned Pulley: If one of the pulleys is not perfectly aligned, it can cause the belt to ride on its edge and squeal.
Overheating Engine
If your engine starts to overheat, and the temperature gauge climbs into the red, the serpentine belt could be the culprit. This happens if the belt drives the water pump. If the belt is slipping or has broken, the water pump won’t circulate coolant, leading to rapid overheating.
Battery Warning Light
The alternator is responsible for charging your battery. If the serpentine belt slips on the alternator pulley or breaks, the alternator won't spin, and the battery warning light on your dashboard will illuminate.
If this light comes on, check the belt immediately.
Loss Of Power Steering
When the serpentine belt breaks or slips significantly on the power steering pump pulley, you’ll notice that steering becomes much harder. This is because the power steering pump is no longer assisting you.
Non-functional Air Conditioning
If your A/C suddenly stops blowing cold air, and you hear no noise from the A/C compressor clutch engaging, the serpentine belt may be the issue. It could be slipping or broken, preventing the compressor from running.
Serpentine Belt Maintenance Schedule And Recommendations
A proactive approach to serpentine belt maintenance can save you from unexpected roadside issues.
Recommended Replacement Interval
While belts can last a long time, they are made of rubber, which degrades over time due to heat, stress, and environmental factors. Most manufacturers