The Jeep Cherokee is a well-known SUV, loved for its ruggedness and off-road ability. But many owners look to upgrade or repair their audio systems.
Whether you want to install a new radio or fix a wiring issue, understanding the Jeep Cherokee radio wiring diagram is crucial. This guide explains what you need to know, from wire color codes to common mistakes.
You’ll also find tables for quick reference and answers to frequent questions.

Why The Radio Wiring Diagram Matters
A radio wiring diagram shows how each wire connects your radio to your Jeep’s electrical system. It helps you avoid mistakes, like connecting a power wire to a speaker wire. One wrong connection can cause electrical shorts or damage the radio. For DIY installers, the diagram is a roadmap for a successful and safe upgrade.
Many people underestimate the importance of matching the right wires. For example, some wires may carry constant power, while others are only live when the ignition is on. Mixing these up can drain your battery or cause your radio to lose memory settings.
Understanding Jeep Cherokee Wire Colors
Wire colors are not random; they follow a pattern. However, the color codes can change by year and model. Always check your Jeep’s manual or the sticker on the radio harness. Here’s a general table for 1997–2001 Jeep Cherokee (XJ) models, which are common among DIYers:
| Wire Color | Function | Connection Point |
|---|---|---|
| Yellow | 12V Constant / Memory | Battery |
| Red | 12V Switched / Accessory | Ignition |
| Black | Ground | Chassis |
| Orange | Illumination | Dash Lights |
| White / White-Black | Front Left Speaker (+/-) | Speaker |
| Gray / Gray-Black | Front Right Speaker (+/-) | Speaker |
| Green / Green-Black | Rear Left Speaker (+/-) | Speaker |
| Purple / Purple-Black | Rear Right Speaker (+/-) | Speaker |
Tip: Older models may use different color codes. Always double-check before making any connection.
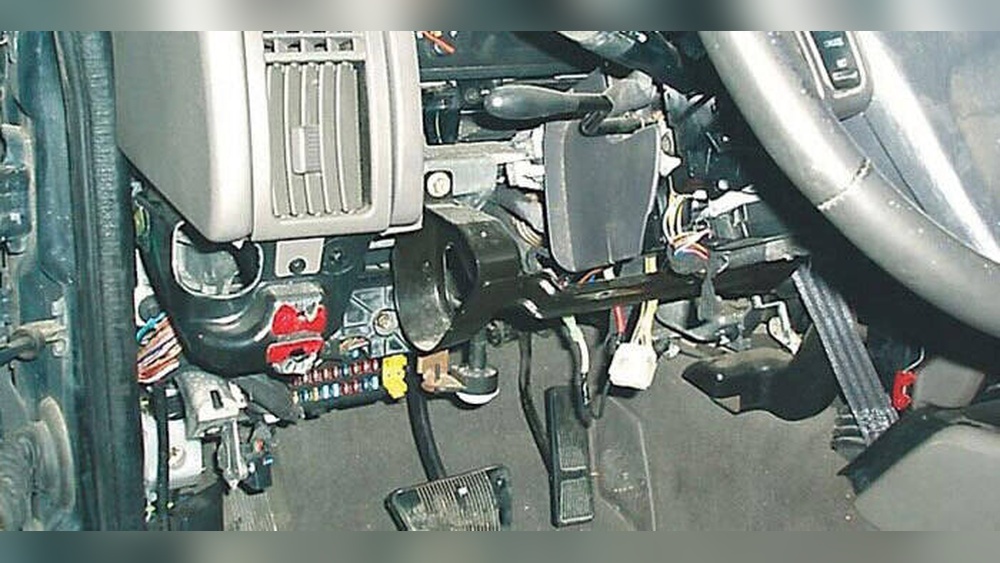
Basic Steps For Radio Installation
Many Jeep Cherokee owners want to install an aftermarket radio. Here’s a simplified step-by-step guide:
- Disconnect the battery to prevent shorts or electrical shock.
- Remove the old radio by unscrewing the dash panel and sliding the unit out.
- Identify the factory harness. Match wires using the wiring diagram above.
- Connect the new radio’s harness. Use crimp connectors or solder and insulate with electrical tape.
- Secure the radio in the dash, and reattach panels.
- Reconnect the battery and test the system.
A common mistake is skipping the ground wire. Without a good ground, your radio may not work, or you could get loud engine noise in the speakers.
Comparing Factory Vs Aftermarket Wiring
Factory radios use unique connectors. Aftermarket radios often need an adapter. Here’s a quick comparison:
| Feature | Factory Radio | Aftermarket Radio |
|---|---|---|
| Wire Connector Type | OEM Plug | Universal ISO / Custom Adapter |
| Color Codes | Chrysler/Jeep Codes | Standard Aftermarket Codes |
| Speaker Impedance | Usually 4 ohms | Usually 4 ohms |
| Compatibility | Limited to factory radios | Works with most brands |
Non-obvious insight: Adapters not only make installation easier, they also keep your vehicle’s warranty intact by avoiding wire cuts.

Troubleshooting Common Wiring Problems
Radio issues are often caused by wiring mistakes. Here’s how to check and fix them:
- No Power: Confirm both the yellow (constant) and red (switched) wires have 12V with a multimeter.
- No Sound: Make sure speaker wires are correctly paired. Swapping positive and negative can cause weak or no audio.
- Memory Loss: If the radio forgets settings, the yellow wire is not connected to constant power.
- Static/Noise: Check the black ground wire. Clean contact with metal is essential.
Here’s a quick troubleshooting summary:
| Problem | Likely Cause | Fix |
|---|---|---|
| Radio won’t turn on | No power or bad ground | Check power and ground wires |
| No sound from speakers | Incorrect wiring | Match speaker wires correctly |
| Radio resets every time | Lost constant 12V | Reconnect yellow wire |
| Engine noise in audio | Poor ground | Improve ground connection |
Expert tip: If you’re unsure about a wire, use a test light or multimeter. Guessing can cause expensive damage.
What To Watch Out For
- Splicing wires without proper connectors can lead to loose connections and shorts.
- Some models have a factory amplifier. You may need a special adapter to keep it working with your new radio.
- Always insulate bare wires; even a tiny exposed wire can cause a short.
Unexpected problem: Aftermarket radios often have extra wires (like for power antenna or amp remote). If not used, cap them off to prevent shorts.
Where To Find Reliable Diagrams
Official service manuals are best, but many Jeep forums and trusted auto sites provide diagrams. For more technical details, the The12Volt.com site is a respected resource among car audio installers.
Frequently Asked Questions
<!– wp:rank-math/faq-block {"questions":[{"id":"faq-question-2a18df33bc39","title":"What Year Jeep Cherokee Does This Wiring Diagram Cover?","content":"The general wiring colors and functions above cover most 1997–2001 Jeep Cherokee XJ models. For other years or trims, always check the owner’s manual or factory diagram.
“,”visible”:true},{“id”:”faq-question-28333d62afa0″,”title”:”Can I Install A New Radio Without Cutting Factory Wires?”,”content”:”Yes, use a wiring harness adapter. It plugs into your factory connector and matches color codes for easy installation. This keeps your wiring intact and can help with resale value.
“,”visible”:true},{“id”:”faq-question-4db3bf45d63f”,”title”:”Why Does My Radio Lose Presets Every Time I Turn Off The Car?”,”content”:”Your radio’s constant 12V wire (usually yellow) is not connected to a battery power source. Check connections, and use a multimeter to verify voltage even when the car is off.
“,”visible”:true},{“id”:”faq-question-4f0239a17570″,”title”:”What Tools Do I Need For Radio Wiring?”,”content”:”Basic tools include:
n- nn
- Wire stripper/crimper nnn
- Electrical tape nnn
- Screwdrivers nnn
- Multimeter or test light n
Some installations require a dash trim removal tool for a clean job.
“,”visible”:true},{“id”:”faq-question-0dddc1c8cdac”,”title”:”Is It Safe To Install A Radio Myself?”,”content”:”If you follow the wiring diagram and basic safety steps (disconnecting the battery, using proper connectors), it is safe for most DIYers. But if you’re unsure, it’s smart to ask a professional for help.
Getting your Jeep Cherokee’s radio wiring right means better sound and fewer headaches. With the right diagram, tools, and a bit of patience, you can upgrade your audio system and enjoy your drive.
“,”visible”:true}]} –>What Year Jeep Cherokee Does This Wiring Diagram Cover?
The general wiring colors and functions above cover most 1997–2001 Jeep Cherokee XJ models. For other years or trims, always check the owner’s manual or factory diagram.
Can I Install A New Radio Without Cutting Factory Wires?
Yes, use a wiring harness adapter. It plugs into your factory connector and matches color codes for easy installation. This keeps your wiring intact and can help with resale value.
Why Does My Radio Lose Presets Every Time I Turn Off The Car?
Your radio’s constant 12V wire (usually yellow) is not connected to a battery power source. Check connections, and use a multimeter to verify voltage even when the car is off.
What Tools Do I Need For Radio Wiring?
Basic tools include:
- Wire stripper/crimper
- Electrical tape
- Screwdrivers
- Multimeter or test light
Some installations require a dash trim removal tool for a clean job.
Is It Safe To Install A Radio Myself?
If you follow the wiring diagram and basic safety steps (disconnecting the battery, using proper connectors), it is safe for most DIYers. But if you’re unsure, it’s smart to ask a professional for help.
Getting your Jeep Cherokee’s radio wiring right means better sound and fewer headaches. With the right diagram, tools, and a bit of patience, you can upgrade your audio system and enjoy your drive.