Wiring rock lights to a switch is a practical upgrade for off-road vehicles, trucks, and ATVs. It helps you control your underbody lighting easily, making night driving safer and more stylish. If you’re new to vehicle wiring, this guide explains each step in simple, clear terms. By following these instructions, you’ll avoid common mistakes and ensure your rock lights operate reliably.
Understanding Rock Light Wiring
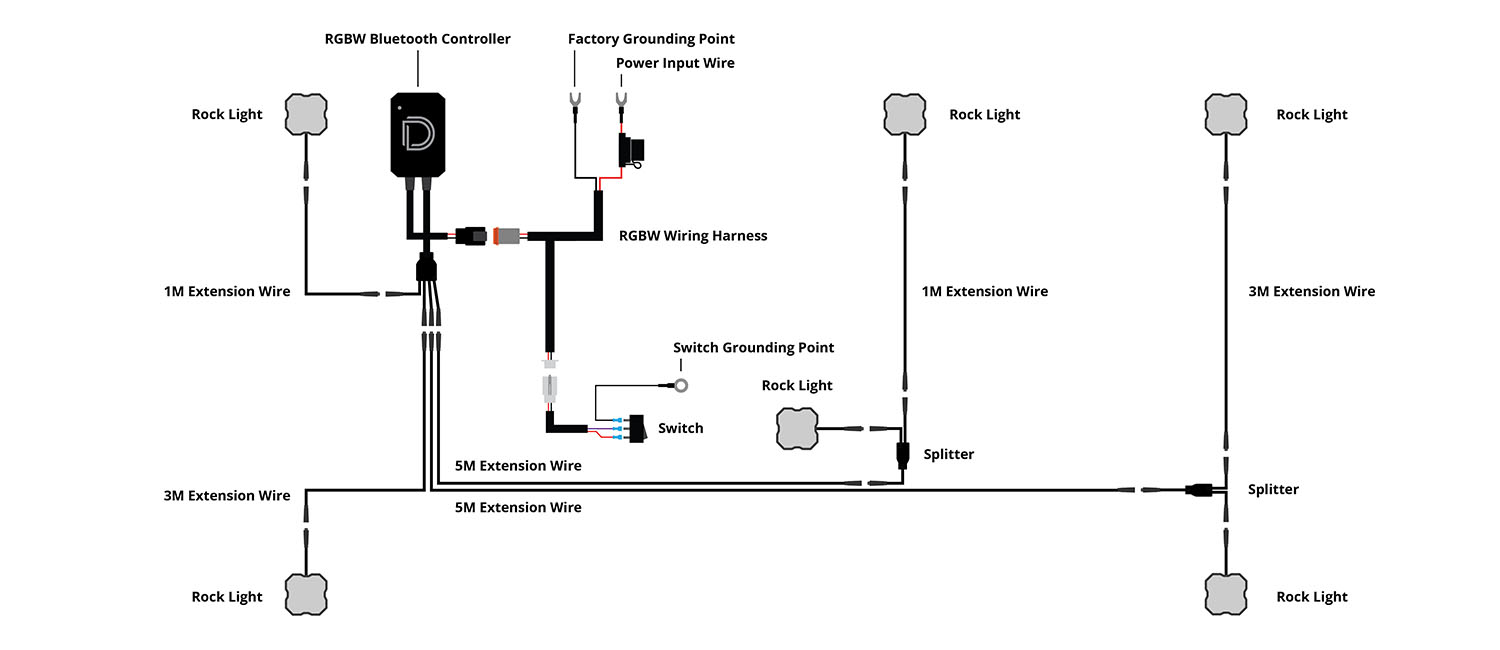
Rock lights are small, durable LEDs mounted underneath a vehicle. They highlight the ground, making obstacles visible at night. Wiring them to a switch gives you control, allowing you to turn them on or off as needed. Many kits come with basic instructions, but custom wiring for a dedicated switch offers more flexibility and better safety.
Here’s a quick overview of what you need:
- Rock lights kit (usually 4–8 lights)
- Automotive switch (toggle or push-button)
- Wiring harness or 14-16 gauge wire
- Inline fuse (typically 15–20 amps)
- Relay (recommended for extra safety)
- Connectors (spade, ring, butt connectors)
- Wire stripper/crimper
- Drill and mounting hardware
Most setups use a relay to protect your switch and wiring from high current. A relay also prevents accidental draining of your battery.
Planning Your Installation
Before starting, decide where to mount the rock lights and the switch. The lights should be placed under the wheel wells or along the frame for maximum coverage. The switch should be accessible from the driver’s seat, often near the dashboard.
Here’s a simple comparison of switch types:
| Switch Type | Ease of Use | Durability | Water Resistance |
|---|---|---|---|
| Toggle Switch | Easy | High | Low |
| Push-Button | Very Easy | Medium | Medium |
| Rocker Switch | Easy | High | High |
Rocker switches are popular for off-road vehicles because they resist moisture and dust well.

Step-by-step Wiring Process
1. Mount The Rock Lights
Begin by attaching the rock lights where you want them. Use the included brackets or screws. Make sure each light faces the ground clearly. Avoid placing them too close to moving parts or heat sources.
2. Route The Wires
Run the wires from each light toward a central point, usually near the battery or fuse box. Keep the wires away from sharp edges, exhaust pipes, and moving parts. Use zip ties or wire loom for protection.
3. Connect To The Relay
A relay is crucial for safe wiring. Here’s a basic relay wiring example:
| Relay Terminal | Wire Connection | Function |
|---|---|---|
| 85 | Ground | Activates relay |
| 86 | Switch output | Triggers relay |
| 87 | Rock lights | Power output |
| 30 | Battery (via fuse) | Power input |
Wire all the positive leads from your rock lights to terminal 87. Connect terminal 30 to the battery through a fuse. Ground terminal 85. Terminal 86 connects to the switch.
4. Install The Switch
Drill a hole in your dashboard or a suitable location. Mount the switch securely. Run a wire from the switch to relay terminal 86. Ground the other terminal of the switch.
5. Fuse And Battery Connection
Install an inline fuse (15–20 amps) between the battery and the relay. This protects your wiring from overheating or catching fire. Connect the negative wires from the lights and the relay to a solid ground point on your vehicle’s frame.
6. Test The System
Before finishing, test the setup:
- Turn the switch off and on.
- Check if all rock lights illuminate.
- Inspect for flickering or dimming.
- Confirm the fuse doesn’t blow.
If you see problems, check connections for loose wires or incorrect polarity.
Common Mistakes And How To Avoid Them
Many beginners forget the fuse, risking electrical fires. Others skip the relay, causing switches to fail from high current. Some use thin wire (18 gauge or smaller), which overheats easily.
Here’s a quick wire gauge comparison:
| Wire Gauge | Max Current (Amps) | Recommended Use |
|---|---|---|
| 14 | 15 | Rock lights (4–8) |
| 16 | 10 | Small kits (up to 4 lights) |
| 18 | 7 | Not recommended |
Always use 14 or 16 gauge wire for safety. Make sure all connections are tight and protected from water.
Practical Tips For A Reliable Setup
- Use heat-shrink tubing on connectors to prevent corrosion.
- Place the switch in a spot you can reach quickly, even with gloves.
- Label wires during installation so you can troubleshoot later.
- If your vehicle often gets wet or muddy, choose waterproof connectors and switches.
One insight many overlook: mounting lights too low can lead to damage from rocks and debris. Place them high enough to stay safe but low enough for good ground visibility.
Another tip: test each light before final installation. This saves time and avoids rework.
For more wiring details, you can check WikiHow’s wiring guide.
Frequently Asked Questions
How Many Rock Lights Can I Wire To One Switch?
Most switches and relays handle up to 8 rock lights safely if you use 14 gauge wire and a 15–20 amp fuse. If using more, consider a higher-rated relay and fuse.
Can I Wire Rock Lights Without A Relay?
It’s possible, but risky. The switch may overheat or fail from too much current. Using a relay protects both your switch and wiring.
What Happens If I Use The Wrong Wire Gauge?
Thin wire can overheat, melt, or cause shorts. Always use 14 or 16 gauge wire for most setups. Check wire ratings if adding extra lights.
How Do I Make My Setup Waterproof?
Use heat-shrink connectors, waterproof switches, and seal all wire entry points. Place the relay and fuse in a dry, protected area.
Is It Safe To Connect Rock Lights Directly To The Battery?
Only if you use a fuse and relay. Direct connections without these can cause electrical fires or battery drain.
Wiring rock lights to a switch is a simple project that improves your vehicle’s safety and appearance. With careful planning, quality materials, and the right steps, you’ll enjoy reliable lighting and easy control every time you hit the trails.