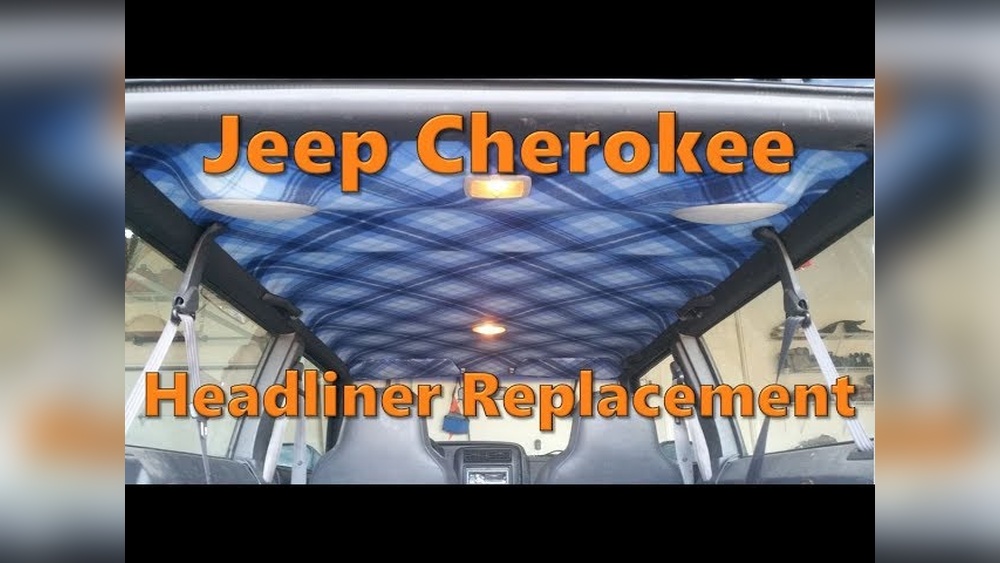
Replacing the headliner in a Jeep Cherokee can completely change the look and feel inside your vehicle. Over time, the fabric headliner often sags, stains, or tears due to heat, humidity, or simple aging. Many owners try to ignore the drooping material, but replacing it restores comfort and value. With the right tools and a careful plan, you can successfully handle this repair at home. This guide covers every step, from removing the old headliner to installing the new one, so you can drive with pride again.
Tools And Materials Needed
Before starting, gather everything you need. Having all tools and materials ready will save time and reduce stress.
- Phillips and flathead screwdrivers
- Socket set
- Trim removal tool (plastic preferred)
- Spray adhesive (high-temperature, headliner-grade)
- Replacement headliner fabric (usually 72” x 60” for Cherokee)
- Scissors or utility knife
- Wire brush or sandpaper
- Safety glasses and gloves
- Cleaning supplies (rags, vacuum)
- Optional: New headliner board if the old one is damaged
Many beginners forget the importance of a high-temperature spray adhesive. Ordinary glues will fail quickly in summer heat. Also, a plastic trim tool is less likely to scratch or break your interior panels.
Removing The Old Headliner
Taking out the headliner is not difficult, but it requires patience. Rushing can break fragile parts, especially in older Cherokees.
- Disconnect the battery to avoid electrical issues, especially with lights and electronics in the ceiling.
- Remove sun visors by unscrewing their brackets.
- Take out dome lights and grab handles by gently prying their covers and removing screws.
- Pull off pillar trim panels around doors and windshield using your trim tool.
- Lower the headliner board carefully. Tilt seats back to make space, and ask for help if needed, as the board is large and flexible.
Many people try to force the headliner board out of the doors. It usually slides out best through the rear hatch. Avoid bending it sharply, or it may crack.
Preparing The Headliner Board
With the old board out, you need to remove the old fabric and glue. This step is messy but important for a lasting result.
- Peel off the old fabric gently. Take your time to avoid tearing chunks from the board.
- Scrape off old foam and glue using a wire brush or sandpaper. The surface should be smooth, as any residue will show through the new fabric.
- Clean the board with a vacuum and a damp cloth. Let it dry fully.
A common mistake is skipping the foam removal. Leftover foam will stop the adhesive from sticking, leading to early sagging.
Installing The New Headliner Fabric
Now for the most satisfying part—applying fresh fabric. Take your time to avoid wrinkles and bubbles.
- Lay out the new fabric over the board. Cut it with 2-3 inches extra on all sides.
- Spray adhesive on half of the board and the back of the fabric. Wait 1-2 minutes for it to become tacky.
- Carefully press fabric onto the board, smoothing from the center outward. Use your hands or a clean roller.
- Repeat for the other half, overlapping slightly in the middle.
- Trim excess fabric around edges, leaving enough to wrap around and glue to the back.
- Cut small holes for lights, visors, and handles only after the glue is dry. Cut carefully to avoid fraying.
If you notice wrinkles, gently lift and reposition the fabric while the glue is still fresh. Do not rush this step.

Reinstalling The Headliner
With the new fabric in place, it’s time to put everything back. Work in the reverse order of removal.
- Slide the headliner board back into the Jeep, using the rear hatch if possible.
- Align and secure the board using the original screws and clips.
- Reconnect dome lights, handles, and visors. Test all electronics before final tightening.
- Reinstall pillar trim panels carefully to avoid cracking.
- Reconnect the battery and check that all lights work.
Many owners forget to test the dome light and sunroof switch before finishing. Always check these before replacing trim.
Cost And Time Estimates
Here is a quick comparison of DIY vs. professional replacement for a Jeep Cherokee headliner:
| Method | Estimated Cost | Time Needed |
|---|---|---|
| DIY (Home) | $60–$120 | 3–5 hours |
| Professional Shop | $300–$600 | 1–2 days (wait time) |
DIY is much cheaper, but it does require patience and attention to detail. The biggest costs are the fabric and adhesive.

Common Problems And Solutions
Let’s compare some frequent issues and how to fix them:
| Problem | Cause | Solution |
|---|---|---|
| Sagging after install | Poor adhesive or unclean board | Use high-temp spray; clean thoroughly |
| Wrinkles in fabric | Poor smoothing during install | Lift and reapply while glue is fresh |
| Broken trim clips | Forcing panels | Use trim tool; buy spares |
Tips For A Professional Result
- Work in a dust-free area to avoid debris under the fabric.
- Let the adhesive cure fully before reinstalling (at least 1 hour).
- Choose a matching color for your Jeep’s interior for a factory look.
- Replace worn trim clips to prevent rattles and sagging.
- Photograph each step during removal. This helps during reassembly, especially with wiring.

Frequently Asked Questions
How Long Does It Take To Replace A Jeep Cherokee Headliner?
Most DIYers need 3 to 5 hours for the full job. If you are new to interior work, plan for extra time. Working slowly prevents mistakes.
Can I Reuse The Old Headliner Board?
Yes, as long as the board is not cracked or water-damaged. If the old board is warped or broken, consider buying a replacement online.
What Fabric Should I Use For The Headliner?
Choose a headliner-specific fabric with foam backing. Avoid regular fabric, as it sags quickly. Most auto supply stores carry this material.
Is Spray Adhesive Safe For Cars?
Use only high-temperature spray adhesive made for automotive use. Ordinary spray glues can fail in heat. Brands like 3M and Permatex are reliable.
Where Can I Find More Details On Jeep Cherokee Interiors?
You can check the official Jeep Cherokee (XJ) Wikipedia page for more model-specific information and history.
Taking on a headliner replacement in your Jeep Cherokee may seem challenging, but it’s a project most owners can complete with patience and preparation. The result is a cleaner, quieter, and more comfortable ride. If you follow each step closely and avoid shortcuts, you’ll enjoy a like-new interior for years to come.