Removing the front drive shaft from your Jeep TJ is a task many owners face when performing repairs or upgrades. Whether you want to replace a worn shaft, fix a leak, or upgrade to a stronger model, the process is straightforward with the right tools and know-how. This guide will walk you through each step, highlight what matters most, and help you avoid common mistakes. Even if you’re not a professional mechanic, you can do this job safely at home.
Understanding The Jeep Tj Front Drive Shaft
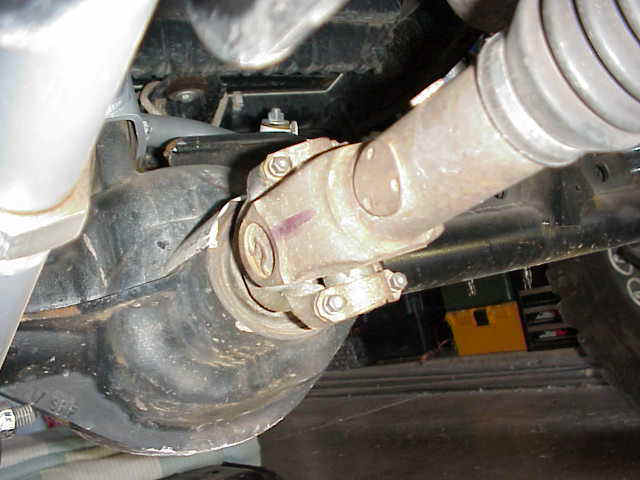
The front drive shaft connects your transfer case to the front axle, allowing power to reach the wheels when four-wheel drive is engaged. It’s made up of universal joints, yokes, and sometimes a slip joint. Over time, these parts wear down, leading to vibrations, clunking noises, or even failure. Removing the shaft lets you inspect, repair, or upgrade these components.
Here’s a quick comparison to help you understand the difference between front and rear drive shafts:
| Feature | Front Drive Shaft | Rear Drive Shaft |
|---|---|---|
| Position | Connects transfer case to front axle | Connects transfer case to rear axle |
| Common Failures | U-joint wear, slip yoke binding | U-joint wear, shaft bending |
| Removal Difficulty | Moderate | Easy to Moderate |
Tools And Preparation
Before starting, gather these tools:
- Socket set (8mm, 10mm, 13mm)
- Wrenches
- Breaker bar
- Needle nose pliers
- Safety glasses
- Gloves
Make sure your Jeep TJ is parked on a flat surface. Apply the parking brake and block the wheels for safety. Some people skip this, but it’s essential to avoid accidents.
Extra Tip
If you have a lifted Jeep, you may need a step stool to reach under comfortably. Always check for rust or seized bolts before starting, as these can cause delays.

Step-by-step Removal Process
Follow these steps for successful removal:
1. Locate The Front Drive Shaft
Crawl under the Jeep and find the front drive shaft between the transfer case and the front axle.
2. Mark The Shaft
Use chalk or a marker to mark the shaft and yoke. This helps you realign during reinstallation.
3. Remove The Front Yoke Bolts
At the axle end, use a 8mm or 10mm socket to remove the four bolts holding the U-joint straps. You might need a breaker bar if bolts are tight.
4. Remove The Rear Yoke Bolts
At the transfer case, use a 13mm wrench or socket. Again, there are usually four bolts.
5. Release The Shaft
Once bolts are removed, gently pull the shaft away from the yokes. Sometimes it sticks, so tap with a rubber mallet. Avoid hitting too hard, as you can damage the yoke.
6. Slide Out The Shaft
Carefully slide the shaft out. If your Jeep has a slip joint, it may extend as you pull.
7. Inspect The Shaft And Yokes
Look for rust, wear, or damage. If you see blue marks on the U-joints, this means overheating—a sign to replace them.
Common Mistakes To Avoid
- Forgetting to mark alignment points.
- Losing small bolts or straps.
- Not checking for rust or seized parts before starting.
Troubleshooting During Removal
Sometimes things don’t go as planned. Here’s a quick troubleshooting table for common problems:
| Problem | Possible Cause | Solution |
|---|---|---|
| Bolts won’t loosen | Rust or overtightening | Use penetrating oil, wait 15 minutes |
| Shaft won’t separate | Stuck slip joint | Tap gently with mallet, apply lubricant |
| U-joint stuck in yoke | Corrosion | Use pliers, wiggle gently |
After Removal: Inspection And Maintenance
Once the shaft is out, take a few minutes to inspect:
- U-joints: Spin them by hand. If they’re stiff or loose, replace.
- Yokes: Check for cracks or excessive wear.
- Shaft: Look for bends, dents, or rust.
If you notice any issues, it’s better to fix them before reinstalling. Most beginners miss inspecting the yoke splines—damaged splines can cause future vibration.
Practical Insight
Many Jeep owners overlook cleaning the mounting surfaces before reinstallation. Dirt and old grease can cause poor fit and extra wear. Use a wire brush and wipe clean.
Reinstallation Tips
If you plan to reinstall the shaft, follow these points:
- Align the marks you made earlier for correct balance.
- Tighten bolts to factory specs (usually 15–20 ft/lbs).
- Use thread locker on bolts for extra security.
- Always test drive after reinstalling to check for vibration.
Safety Reminders
Never work under a vehicle supported only by a jack. Use jack stands for safety. Wear safety glasses to protect your eyes from falling debris.
Frequently Asked Questions
How Long Does It Take To Remove The Front Drive Shaft?
For most people, it takes about 30–45 minutes if bolts aren’t rusted. If you’re new to DIY repairs, allow up to an hour.
Do I Need To Remove The Drive Shaft For U-joint Replacement?
Yes. Removing the front drive shaft is necessary for proper U-joint replacement. It lets you access both ends and press out the old joints.
Can I Drive My Jeep Tj Without The Front Drive Shaft?
You can drive in 2WD without the front drive shaft installed. However, avoid off-road driving or engaging 4WD, as power won’t reach the front axle.
What Are Signs Of A Bad Front Drive Shaft?
Common signs include vibration, clunking noises, or visible rust. If you notice blue discoloration on the shaft, it’s a sign of overheating.
Where Can I Find Official Torque Specs For The Bolts?
Official specs are available from the Jeep service manual or trusted sources like Jeep Official Service Info.
Removing the front drive shaft from your Jeep TJ is a manageable task for most owners. With careful preparation, the right tools, and attention to detail, you can complete the job safely and efficiently. Checking for wear and cleaning mounting surfaces are steps often skipped by beginners, but they help ensure a smooth ride after reinstallation.
By following this guide, you’ll build confidence in maintaining your Jeep and keep it ready for both road and trail adventures.