Replacing a control arm is a task many car owners face as their vehicles age. The control arm is a crucial suspension component that connects the wheel hub to the car’s frame. It helps control wheel movement, absorbs shocks, and keeps your ride stable. A worn or damaged control arm can cause poor handling, uneven tire wear, and even unsafe driving conditions. While the job is not as simple as changing oil, with the right preparation and attention to detail, it is possible for a careful DIYer to install a new control arm at home. This guide walks you through the process, highlights important details, and addresses common mistakes, so you can approach this repair with confidence.
When Should You Replace A Control Arm?
Several warning signs suggest your control arm may need replacement:
- Clunking noises when driving over bumps
- Steering wheel vibration or pulling to one side
- Uneven tire wear
- Visible damage or rust on the control arm
In most cases, a mechanic will confirm the issue during an inspection. However, DIYers can also spot problems by checking for loose or cracked bushings and ball joints on the control arm.
Tools And Parts You’ll Need
Before starting, gather the following:
- New control arm (make sure it matches your car’s year, make, and model)
- Jack and sturdy jack stands
- Lug wrench
- Socket set and wrenches (metric and standard)
- Torque wrench
- Pry bar
- Hammer or mallet
- Penetrating oil (for rusty bolts)
- Gloves and safety glasses
For some vehicles, you may also need a ball joint separator or pickle fork. Always check your car’s service manual for special requirements.
Preparation And Safety Steps
- Park on a flat surface. Engage the parking brake.
- Loosen wheel lug nuts slightly before raising the car.
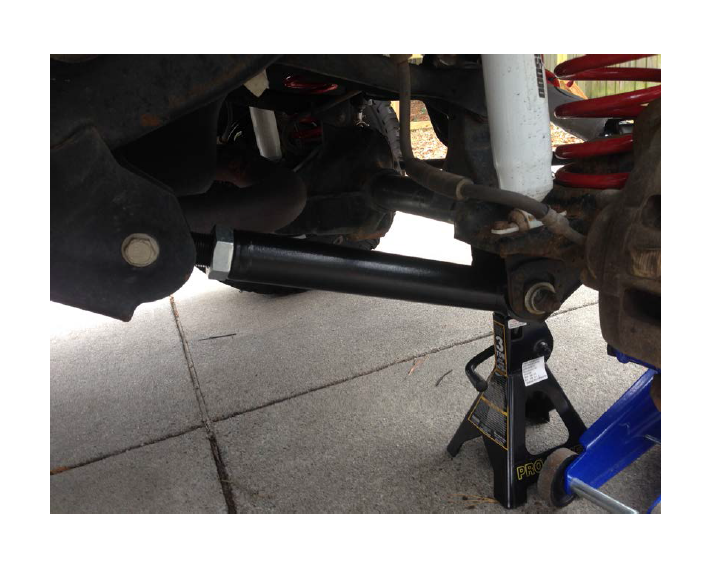
- Lift the vehicle using a jack and support it with jack stands under the frame.
- Remove the wheel to access the control arm.
Tip: Take a photo of the assembly before starting. This helps when re-installing parts in the correct order.
Step-by-step: How To Install A Control Arm
1. Remove The Old Control Arm
- Spray penetrating oil on all bolts and nuts. Wait a few minutes for it to work.
- Disconnect the sway bar link (if attached) from the control arm.
- Remove the ball joint nut. Use a ball joint separator if the joint is stuck.
- Unbolt the control arm from the vehicle frame or subframe. There may be one or two bolts, depending on the design.
- Carefully pry out the control arm. Avoid damaging nearby brake lines or suspension components.
2. Compare Old And New Parts
Before installing, place the old and new control arms side by side. Check for:
- Bolt hole locations
- Bushing and ball joint orientation
- Overall length and shape
This quick comparison helps avoid installation errors. Some beginners skip this, only to realize later that the part does not fit properly.
3. Install The New Control Arm
- Position the new control arm in place. Loosely thread in the bolts by hand.
- Reconnect the ball joint to the steering knuckle. Tighten the nut to the manufacturer’s torque specification.
- Attach the sway bar link if present.
- Tighten all bolts to the correct torque. Use a torque wrench for accuracy.
Important: Do not fully tighten the frame bolts until the suspension is loaded (car is on the ground). This prevents premature bushing wear.
4. Reassemble And Lower The Vehicle
- Reinstall the wheel and hand-tighten the lug nuts.
- Lower the car back to the ground.
- Tighten lug nuts to the specified torque.
Finish tightening the control arm-to-frame bolts once the car is resting on its wheels. This step is often forgotten, leading to squeaky bushings or early failure.
5. Final Checks
- Double-check all bolts for tightness.
- Test drive at low speed. Listen for unusual noises or changes in handling.
- Get a wheel alignment as soon as possible. Improper alignment can cause tire wear and poor handling.

Comparison: Control Arm Types
Choosing the right control arm depends on your car and driving needs. Here is a quick comparison of common types.
| Type | Material | Typical Use | Durability |
|---|---|---|---|
| Stamped Steel | Steel | Economy, older cars | Moderate |
| Forged Steel | High-strength steel | Trucks, heavy vehicles | High |
| Aluminum | Aluminum alloy | Performance/luxury cars | High (but may crack) |
Common Mistakes To Avoid
Many DIYers run into problems during control arm replacement. Watch out for these issues:
- Not using a torque wrench: Guessing bolt tightness can cause parts to loosen or break.
- Tightening bushings with suspension unloaded: Leads to early bushing wear.
- Skipping alignment: You might experience poor handling or rapid tire wear.
Here’s a quick overview of what to do and what not to do.
| Do | Don’t |
|---|---|
| Use correct torque settings | Over-tighten or under-tighten bolts |
| Check part compatibility | Assume all control arms fit |
| Get a wheel alignment | Skip alignment after install |
Real-world Example
A 2012 Honda Accord owner noticed a persistent clunking noise and uneven tire wear. After inspecting the suspension, they found the lower control arm bushings were cracked. The owner sourced a replacement, followed the steps above, and completed the job in about two hours.
After installation and a wheel alignment, the car drove smoothly, and the noise disappeared.
Cost And Time Estimates
- Replacement part: $50–$200 (per control arm)
- Labor (if done professionally): $150–$300
- DIY time: 1.5 to 3 hours
Some modern cars may require extra steps or special tools. Always check the service manual for your vehicle.

Extra Tips For A Successful Installation
- Label bolts and nuts as you remove them. This prevents mix-ups during reassembly.
- Check related parts such as ball joints and bushings while you have the suspension apart.
- Work on one side at a time to use the assembled side for reference.
If you’re unsure at any step, consult a professional or review a trusted online guide like the one at wikiHow.
Frequently Asked Questions
How Do I Know If My Control Arm Needs Replacement?
Look for clunking noises, uneven tire wear, poor handling, or visible damage to bushings and joints. A mechanic can confirm the diagnosis.
Can I Drive With A Bad Control Arm?
Driving with a damaged control arm is unsafe. It can lead to loss of control, especially during braking or cornering.
Do I Need To Replace Both Control Arms At Once?
It’s not required, but replacing both sides can help maintain balanced handling and even tire wear.
Is An Alignment Necessary After Changing A Control Arm?
Yes, a wheel alignment is strongly recommended. Installing a new control arm can change suspension geometry.
What If I Can’t Remove A Stuck Bolt?
Apply penetrating oil and allow it to soak. If it’s still stuck, use heat carefully or consult a professional to avoid damaging parts.
Installing a control arm is a moderate DIY job that demands care and patience. With the right tools, attention to detail, and these expert tips, you can restore your car’s stability and safety.