Looking for a way to get beautiful, lifted lashes without visiting a salon? At home eyelash lift kits are now a popular choice. These kits promise longer-looking, curled lashes in less than an hour. But how do they work, and are they safe for beginners?
Let’s explore everything you need to know to decide if a DIY lash lift is right for you.
What Is An At Home Eyelash Lift Kit?
An eyelash lift kit is a set of products that help curl and lift your natural lashes. The main idea is to use gentle chemicals to shape your lashes upward, making them look longer and fuller. It’s similar to a perm, but for your eyelashes.
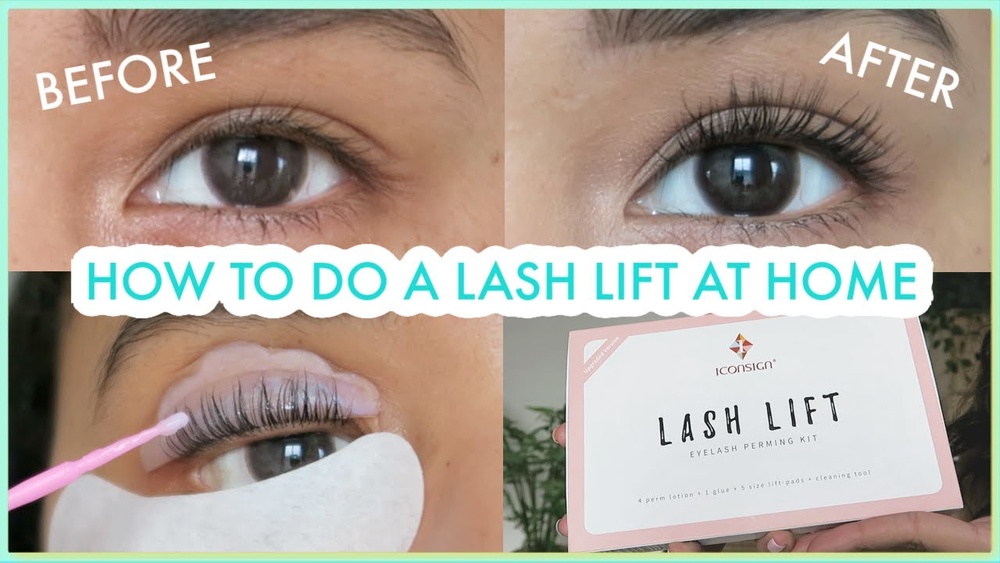
Most kits include:
- Perm solution to soften lashes
- Setting solution to hold the curl
- Silicone pads or shields to lift lashes
- Adhesive to hold lashes on pads
- Cleanser and nourishing oil
These kits are designed for home use, but you must follow instructions carefully to avoid mistakes.
How Do At Home Eyelash Lift Kits Work?
The process is simple but requires attention to detail. Here’s how a typical kit is used:
- Clean your lashes to remove oils and makeup.
- Apply silicone pads on your eyelids.
- Attach lashes to the pads using adhesive.
- Apply perm solution and wait for the suggested time.
- Apply setting solution to lock the curl.
- Remove pads and clean lashes.
- Apply nourishing oil for extra care.
Most kits take about 30–45 minutes to complete, and the results last 6–8 weeks.

Key Factors To Consider Before Buying
Not all lash lift kits are the same. Here are the most important things to check before choosing one:
| Factor | Why It Matters |
|---|---|
| Ingredients | Some formulas use harsh chemicals. Look for kits labeled as safe or hypoallergenic. |
| Application Tools | Quality pads and brushes make the process easier and safer. |
| Instructions | Clear, detailed guides are essential, especially for first-timers. |
| Number of Uses | Some kits last for 5–10 applications, while others are single-use. |
| Price | Most kits cost $15–$50. Higher price doesn’t always mean better results. |
Pro tip: Always do a patch test first to check for allergies or sensitivity.
Pros And Cons Of At Home Lash Lift Kits
Before you buy, it helps to weigh the benefits and downsides.
| Pros | Cons |
|---|---|
| Much cheaper than salon treatments | Risk of irritation or eye injury if used incorrectly |
| Convenience—do it anytime at home | Results may be uneven for beginners |
| Can last up to 8 weeks | Requires patience and steady hands |
| No need for daily curling or mascara | Some kits contain strong odors or chemicals |

Common Mistakes And How To Avoid Them
Many first-time users make small errors that can affect results or safety. Here are two non-obvious tips most people miss:
- Don’t rush the process. Skipping steps or speeding up the timing can lead to uneven curls or even lash damage. Set aside enough time and follow each step.
- Choose the right pad size. The silicone pad size changes the curl effect. Large pads give a subtle lift, while small pads create a dramatic curl. Experimenting with sizes helps you find your best look.
Other common mistakes include:
- Not cleaning lashes well before starting
- Using too much or too little solution
- Not letting the solutions sit for the correct time
If you’re unsure, watch a video tutorial or read trusted guides before starting.
At Home Lash Lift Vs. Salon Lash Lift
Wondering if you should try a DIY kit or visit a professional? Here’s a quick comparison:
| Aspect | At Home Kit | Salon Service |
|---|---|---|
| Cost | $15–$50 | $60–$150 |
| Time | 30–45 minutes | 45–60 minutes |
| Skill Needed | Beginner-friendly, but practice helps | Done by trained professionals |
| Risks | Self-applied, so higher risk of mistakes | Lower risk, more consistent results |
| Results | Can vary, lasts 6–8 weeks | Usually more uniform, lasts 6–8 weeks |
If you want to save money and have steady hands, DIY kits are a good option. But for special events or if you’re nervous, a salon might be worth the extra cost.
Safety Tips For At Home Eyelash Lift Kits
Safety should always come first when using products near your eyes. Here are some key tips:
- Always read and follow the instructions in your kit.
- Do a patch test 24 hours before using the solutions on your lashes.
- Avoid getting any solution in your eyes. If this happens, rinse with water immediately.
- Use a mirror and good lighting during the process.
- Do not use the kit if you have eye infections or sensitive skin.
If you experience redness, itching, or pain, stop immediately and consult a doctor.
Frequently Asked Questions
How Long Does An At Home Eyelash Lift Last?
A DIY lash lift usually lasts 6 to 8 weeks, depending on your lash growth cycle and aftercare.
Can I Wear Mascara After Doing A Lash Lift At Home?
Yes, you can use mascara after a lash lift. Just wait 24–48 hours before applying eye makeup to let the curl set fully.
Is It Safe To Use An At Home Eyelash Lift Kit?
Most kits are safe if you follow instructions and do a patch test first. However, there’s a small risk of irritation or allergic reaction.
How Do I Care For My Lashes After A Lift?
Keep your lashes dry for the first 24 hours. Avoid rubbing your eyes and use a nourishing oil to keep lashes healthy.
Where Can I Learn More About Eyelash Lifts?
For deeper information and safety guidelines, visit the American Academy of Dermatology.
With the right kit and careful steps, an at home eyelash lift can be a safe way to get stunning lashes. Start slow, follow the tips above, and enjoy your new look with confidence.