Replacing the blinker light on your Jeep Rubicon might sound tricky, but it’s a job most people can do at home. Whether you’re fixing a burnt-out bulb or upgrading to a brighter one, a working blinker is essential for safety. This guide will walk you through each step so you can finish the job quickly and confidently—even if you’ve never done it before. You’ll also learn helpful tips, common mistakes to avoid, and how to choose the right bulb. By the end, you’ll know exactly what to do and have answers to the questions most Jeep owners ask.
Why Blinker Lights Matter On Your Jeep Rubicon
Blinker lights, also called turn signals, are more than just a legal requirement. They help you communicate with other drivers on the road. When a blinker light fails, other drivers may not know your intentions, which increases the risk of accidents. According to the Society of Automotive Engineers, turn signal neglect causes over 2 million accidents annually in the US. That’s why replacing a dead blinker bulb right away is so important.
Tools And Materials Needed
Before you start, gather these items. Having the right tools ready will make the process smoother.
- Replacement blinker bulb (check your owner’s manual for the correct type, usually 3157 or 7440 for Jeep Rubicon)
- Flathead screwdriver or trim removal tool
- Phillips screwdriver (some models)
- Clean gloves (to avoid touching the new bulb)
- Safety glasses
- Socket wrench set (if needed for your model)
- Owner’s manual (for reference)
It’s a good idea to double-check the exact bulb type for your Jeep’s year and trim. Using the wrong bulb can cause it to fit poorly or not work at all.

Understanding Jeep Rubicon Blinker Bulb Types
Not all bulbs are the same. Choosing the correct blinker bulb affects brightness, lifespan, and compatibility. Here’s a quick comparison of the main types:
| Bulb Type | Brightness | Lifespan | Cost |
|---|---|---|---|
| Halogen | Moderate | 1-2 years | Low |
| LED | High | 5+ years | Moderate to High |
| Incandescent | Standard | 1 year | Very Low |
LED bulbs are a popular upgrade. They are brighter, last longer, and use less power. However, some Jeep Rubicons may need an extra resistor to prevent the “hyper-flash” warning (blinker flashes too quickly). Always check compatibility if you switch to LED.
Step-by-step Guide: How To Replace Blinker Light On Jeep Rubicon
Now, let’s get into the main part—changing the blinker bulb. The steps below apply to most Jeep Rubicon models from 2012 onwards, but always check your manual for small differences.
1. Safety First
- Park your Jeep on a flat surface.
- Turn off the engine and remove the key.
- Turn off all lights.
- Engage the parking brake.
- Let the car cool down if you’ve just driven it.
2. Locate The Blinker Assembly
On most Rubicons, the front blinker is part of the headlight assembly or sits just below it on the fender. Rear blinkers are in the tail light assembly.
- Open the hood for front blinkers or the tailgate for rear blinkers.
- Use your owner’s manual to identify the exact location.
3. Remove The Assembly (if Needed)
Some models allow you to access the bulb from behind the assembly, while others require removing the headlight or tail light housing.
- For front blinkers, look for small screws or plastic clips holding the assembly.
- Use a screwdriver or trim tool to remove these gently.
- Carefully pull the assembly forward. Don’t force it—some wires may still be attached.
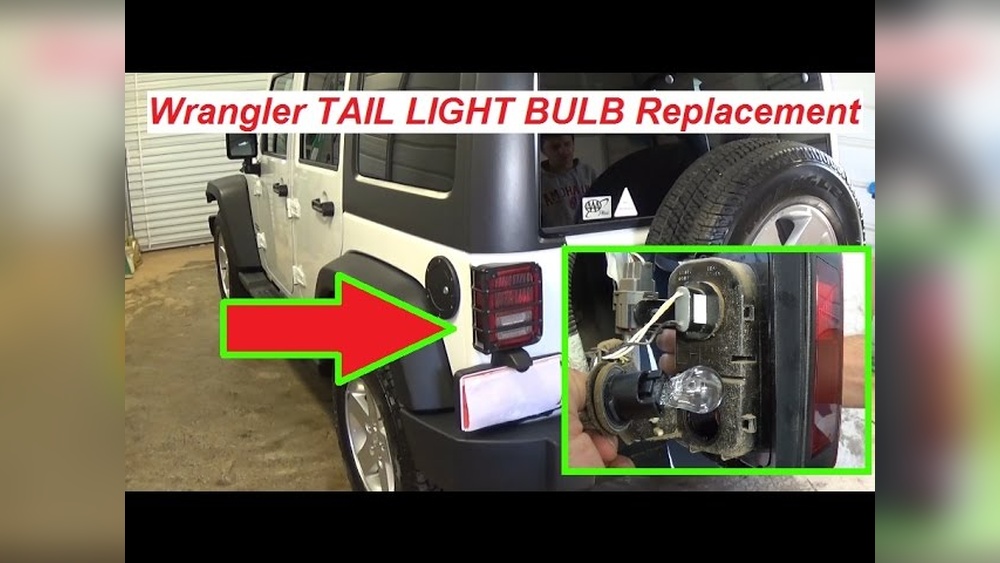
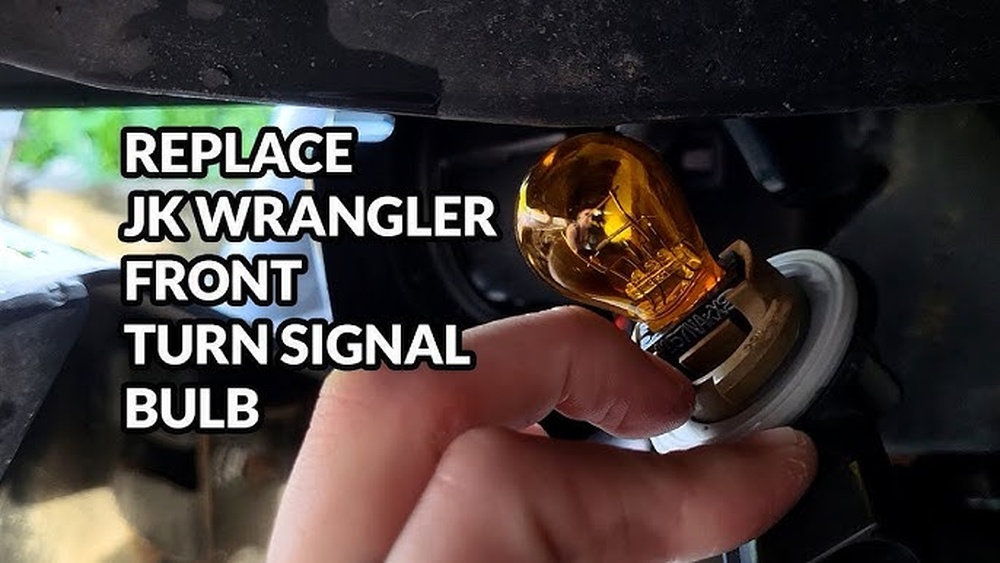
4. Remove The Old Bulb
- Find the blinker bulb socket (usually a round base with wires).
- Twist the socket counterclockwise and pull it out.
- Gently pull the old bulb straight out of the socket.
Practical tip: If the bulb is stuck, wiggle it gently. Never use excessive force, as this could break the bulb or socket.
5. Install The New Bulb
- Hold the new bulb by the base, not the glass. Oils from your fingers can shorten its life.
- Insert the bulb firmly into the socket.
- If using an LED bulb, check the polarity: If it doesn’t work, flip it and try again.
6. Reinstall The Assembly
- Place the socket back into the assembly and twist clockwise to lock.
- Reattach the assembly to your Jeep using the screws or clips.
- Make sure everything fits snugly—loose parts can let in water or dust.
7. Test The Blinker
- Turn on your Jeep and activate the blinker.
- Check both the replaced bulb and the opposite side for comparison.
- Also, check for “hyper-flash” (rapid blinking). If you see this, you may need a resistor for LED bulbs.
8. Dispose Of The Old Bulb Properly
Many bulbs contain small amounts of metal or glass that should not go in regular trash. Check your local recycling guidelines.

Jeep Rubicon Blinker Bulb Compatibility By Year
Use this quick guide to find the right bulb type for your Jeep Rubicon model year:
| Model Year | Front Blinker Bulb | Rear Blinker Bulb | LED Compatible? |
|---|---|---|---|
| 2012-2017 | 3157 | 7440 | Yes (with resistor) |
| 2018-2021 | 7443 | 7440 | Yes |
| 2022+ | 7444NA | 7444NA | Yes |
Always verify with your manual or a trusted auto parts site before buying.
Common Mistakes To Avoid
Many first-time DIYers run into the same problems when replacing blinker lights. Here are two mistakes that often go unnoticed:
- Forgetting to check both sides: Sometimes, if one bulb is out, the other may be close to failing. Change them both if they’re old to save time.
- Skipping the test before finishing: Always test your new bulb before putting the assembly back. It’s frustrating to reassemble everything, only to find the bulb doesn’t work.
Other frequent errors include:
- Touching the glass of the new bulb (shortens bulb life)
- Forcing parts back together (can break clips)
- Not using the correct tools (leads to stripped screws)
Tips For Easier And Safer Installation
A few extra tips can make the process smoother:
- Work in daylight or use a bright work light.
- Place removed screws and clips in a small container so you don’t lose them.
- If you’re replacing a bulb in cold weather, warm up the assembly slightly to prevent cracking plastic.
- Wear gloves, especially with halogen bulbs, to avoid skin oils causing hot spots.
When To Replace The Whole Blinker Assembly
Most of the time, you only need to replace the bulb. But sometimes, the assembly itself may be damaged:
- Cracked or foggy lens: Reduces visibility and lets in moisture.
- Broken clips or mounts: Assembly won’t sit tightly, risking water leaks.
- Corroded socket: Can cause intermittent or no power to the bulb.
If you see these problems, consider replacing the full assembly. This is more expensive but ensures long-term safety.

Choosing Quality Replacement Bulbs
Buying a cheap bulb may save money today but can lead to early failure or weak light output. Here’s what to look for in a good replacement:
- Brightness: Check the lumens rating. Brighter bulbs are safer, especially in bad weather.
- Brand reputation: Stick with known brands (Sylvania, Philips, or official Mopar parts).
- Warranty: Some bulbs come with a longer warranty, showing the manufacturer’s confidence.
For more on choosing the right automotive bulbs, visit the Consumer Reports automotive lighting guide.
Cost And Time Estimates
Many Jeep owners wonder how much time and money this job will take. Here’s a realistic breakdown:
| Task | DIY Time (minutes) | Cost (USD) |
|---|---|---|
| Replace single bulb | 10-20 | $5-$20 |
| Replace both front or rear bulbs | 20-30 | $10-$40 |
| Replace full assembly | 30-60 | $75-$200 |
A shop may charge $50-$100 for labor alone. Doing it yourself saves money and gives you a useful skill.
Signs Your Blinker Light Needs Replacement
Sometimes, a blinker stops working without warning, but often there are hints:
- Fast blinking on the dashboard indicator (hyper-flash)
- Blinker light not turning on at all
- Dim or flickering light
- Error message on the dashboard (newer models)
If you notice any of these, check your bulbs right away.
Non-obvious Insights For Jeep Rubicon Owners
Many owners don’t realize these points until they have a problem:
- After heavy off-roading, mud and water can get into the blinker assembly. Inspect bulbs after every trip to keep them working.
- LED upgrades may need coding: Some newer Jeep Rubicons need software updates or “coding” when switching to LED. This prevents warning lights and ensures proper blinking.
Checking your blinker bulbs at least twice a year—before winter and summer—helps catch issues before they become serious.
Frequently Asked Questions
What Bulb Type Does My Jeep Rubicon Use For Blinker Lights?
Check your owner’s manual, but most Rubicons use 3157 or 7440 for front and rear blinkers. The exact type can change by year and trim. Always confirm before buying.
Can I Replace A Blinker Bulb Without Removing The Assembly?
On some Jeep Rubicon models, you can reach the bulb from behind the assembly by opening the hood or tailgate. On others, you’ll need to remove the assembly. If you’re unsure, try accessing the socket from behind first.
Why Does My New Led Blinker Flash Too Quickly?
This is called “hyper-flash.” It happens because LED bulbs use less power than halogen bulbs, confusing the Jeep’s system. Installing a resistor or using LED bulbs with built-in resistors usually fixes the problem.
How Often Should I Replace My Blinker Bulbs?
Blinker bulbs usually last 1-2 years for halogen and up to 5 years for LED. Replace them as soon as you notice dimming, flickering, or a warning on your dashboard.
Is It Safe To Drive With A Broken Blinker Light?
It’s not recommended. A broken blinker makes it hard for other drivers to know your intentions, increasing accident risk. In many states, it’s illegal and can lead to a ticket.
Replacing your Jeep Rubicon’s blinker light is a smart way to keep your vehicle safe and legal. With the right tools and a bit of patience, most owners can do it themselves in under half an hour. Remember to choose quality bulbs, check both sides, and keep an eye out for signs of trouble. A few minutes spent on this simple job can prevent accidents and costly repairs down the road.