Removing the inner door panel from a Jeep Wrangler may sound intimidating, but with the right approach, it’s a manageable project for most DIYers. Whether you’re replacing speakers, fixing a window, or simply curious about your vehicle’s internals, learning how to take off the door panel can save you time and money. This guide is designed for beginners and will help you avoid common mistakes, so you don’t damage the door or its components.
Why Remove The Inner Door Panel?
There are several reasons you might need to remove the inner door panel of your Jeep Wrangler:
- To replace speakers or upgrade the sound system
- To fix a window regulator or power window motor
- To repair or replace the door lock or handle
- To address wiring issues or add new accessories
Most owners do this for speaker upgrades, but many also need to access the panel for maintenance. Taking off the panel yourself can save on labor costs—dealerships often charge between $75 and $200 just to remove a door panel.
Tools And Materials Needed
Before starting, it’s important to gather the right tools. Using the correct tools prevents scratches and broken clips.
- Phillips screwdriver
- Trim removal tool (plastic recommended)
- Flathead screwdriver (optional)
- Torx driver (most Jeep Wranglers use T25 or T30)
- Small container for screws and clips
- Gloves (optional, but recommended)
| Tool | Purpose | Notes |
|---|---|---|
| Phillips screwdriver | Remove screws | Essential for most Jeep models |
| Trim tool | Pry off panel safely | Reduces risk of damage |
| Torx driver | Specialty screws | T25/T30 common on Wranglers |
Using a trim removal tool is especially important. A screwdriver can damage the paint or plastic, while a plastic tool is safer.
Step-by-step Guide: Removing The Door Panel
Let’s break down the process into clear steps. These instructions apply to most Jeep Wrangler models from 2007 onward (JK and JL), but always check your specific year.
1. Prepare The Workspace
- Park your Jeep on a level surface.
- Make sure the window is up (this prevents damage and makes removal easier).
- Disconnect the negative battery terminal if you’ll be working near electrical components.
2. Remove Visible Screws
- Look for screws near the door handle, armrest, and sometimes the door pocket.
- Most Wranglers have 2–3 screws holding the panel. Use the correct screwdriver or Torx driver.
3. Pry Off Trim Pieces
- Some Wranglers have a small plastic cover behind the door handle. Gently pry it off with a trim tool.
- Remove any trim hiding screws.
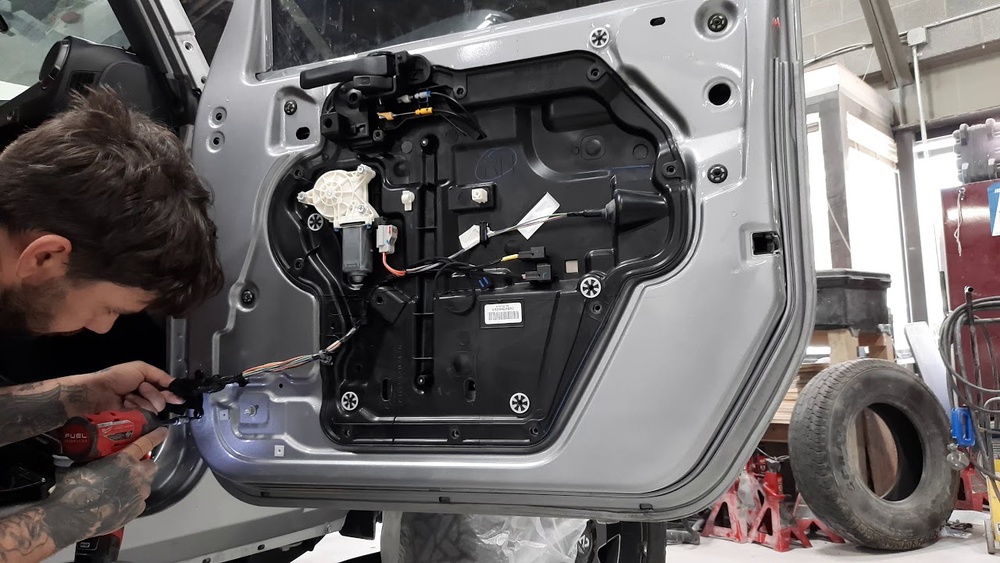
4. Release The Panel Clips
- Insert your trim removal tool between the panel and the door at the bottom corner.
- Gently pry until you hear a pop—this is the first clip releasing.
- Move along the edge, popping each clip. There are usually 8–10 clips per door.
Clip Locations Example
| Clip Position | Approximate Number |
|---|---|
| Bottom edge | 3-4 |
| Sides | 4-5 |
| Top edge | 1-2 |
5. Lift And Remove The Panel
- Once all clips are loose, lift the panel upward—it usually hooks over the top edge.
- Don’t pull too hard; there may be wires connected to the power window switch or door lock.
6. Disconnect Electrical Connectors
- If your Wrangler has power windows or locks, carefully unplug the connectors.
- Press the tab and pull gently—never yank the wires.
7. Set The Panel Aside
- Place the panel on a soft surface to avoid scratches.
- Keep all screws and clips in your container for reassembly.
Tips For A Smooth Removal
- Take photos as you go; it helps when putting everything back.
- If a clip breaks, replace it—panels can rattle or feel loose otherwise.
- Some panels may have sound deadening material attached. If it comes loose, reattach it with spray adhesive.
One insight beginners miss: door panel clips are designed to break occasionally. Don’t panic if one snaps; they are cheap and available online or at auto parts stores.
Another common mistake is forgetting to check for hidden screws under small covers or armrests. Missing these can lead to cracked panels when you pry too hard.
Reinstalling The Door Panel
Putting the panel back is mostly the reverse process, but pay attention to:
- Reconnect all electrical plugs before aligning the panel.
- Line up the top hooks first, then press the panel into place.
- Push firmly to snap all clips back in.
- Replace all screws and trim covers.
- Test the window and lock functions before finishing.
If you hear rattles after reinstalling, you may have missed a clip or screw.
Common Questions And Troubleshooting
If the panel feels stuck, double-check for hidden screws. For panels with manual windows, you may need to remove the window crank first. On some Wranglers, the window crank is held by a small retaining clip; a special tool makes removal easier.
For more detailed instructions, check the official Jeep Owner’s Manual.

Frequently Asked Questions
How Long Does It Take To Remove A Jeep Wrangler Door Panel?
For beginners, expect about 30–45 minutes for the first time. With practice, it can be done in 15–20 minutes.
What Should I Do If A Clip Breaks?
Replace broken clips before reinstalling the panel. Most auto parts stores carry universal door panel clips that fit Jeep models.
Do I Need To Disconnect The Battery?
If your Wrangler has power windows or locks, disconnect the negative battery terminal to avoid short circuits.
Can I Reuse All Screws And Clips?
You can reuse screws unless they’re stripped. Clips can often be reused, but replace any that are cracked or broken.
Are The Steps The Same For All Wrangler Models?
Most steps are similar for JK (2007–2018) and JL (2018–present) Wranglers, but some older models may have more screws or different clip layouts. Always check your model’s details before starting.
Taking off your Jeep Wrangler’s inner door panel is a straightforward job with the right tools and patience. By following each step and paying attention to details, you’ll save time and avoid damage. Remember, take your time, keep your screws organized, and if you ever feel unsure, consult your owner’s manual or a trusted online resource.
With practice, you’ll become more confident working on your Wrangler and be ready for many future upgrades or repairs.