Removing the radio from a Jeep Wrangler is a popular DIY project. Whether you want to upgrade to a modern stereo, repair a faulty unit, or access wiring behind the dash, this job can be completed with basic tools and some careful steps. Many Wrangler owners are surprised by how manageable this task is, but a few details often trip up beginners. This guide will help you avoid common mistakes and finish the job smoothly.
Tools And Preparation
Before you start, gather these items:
- Trim removal tool or flathead screwdriver (with tape to protect panels)
- Phillips screwdriver
- Socket wrench with 7mm or 10mm socket (depends on model year)
- Soft towel (to protect surfaces)
- Gloves (optional, for better grip)
Disconnect your battery before working on the radio. This prevents electrical shorts and protects your Jeep’s electronics.

Pro tip: Take a photo of your radio and dashboard before you remove anything. This makes reassembly easier.
Step-by-step Guide To Remove Jeep Wrangler Radio
The process varies slightly by model year, but most Wranglers from 2007 to present (JK, JL, and Gladiator models) follow these general steps.
1. Remove Trim Panels
Start by gently prying off the dashboard trim around the radio. Use a trim removal tool or carefully use a flathead screwdriver with tape on the tip to avoid scratches.
- On JK models (2007–2018), the trim around the radio and air vents is one piece.
- On JL models (2018+), you may need to remove the climate control panel first.
Tip: Work slowly and apply even pressure. Clips can break if you force them.
2. Unscrew The Radio
With the trim removed, you’ll see 2 to 4 screws holding the radio in place. Most Wranglers use Phillips or 7mm hex screws. Remove these screws and keep them in a safe place.
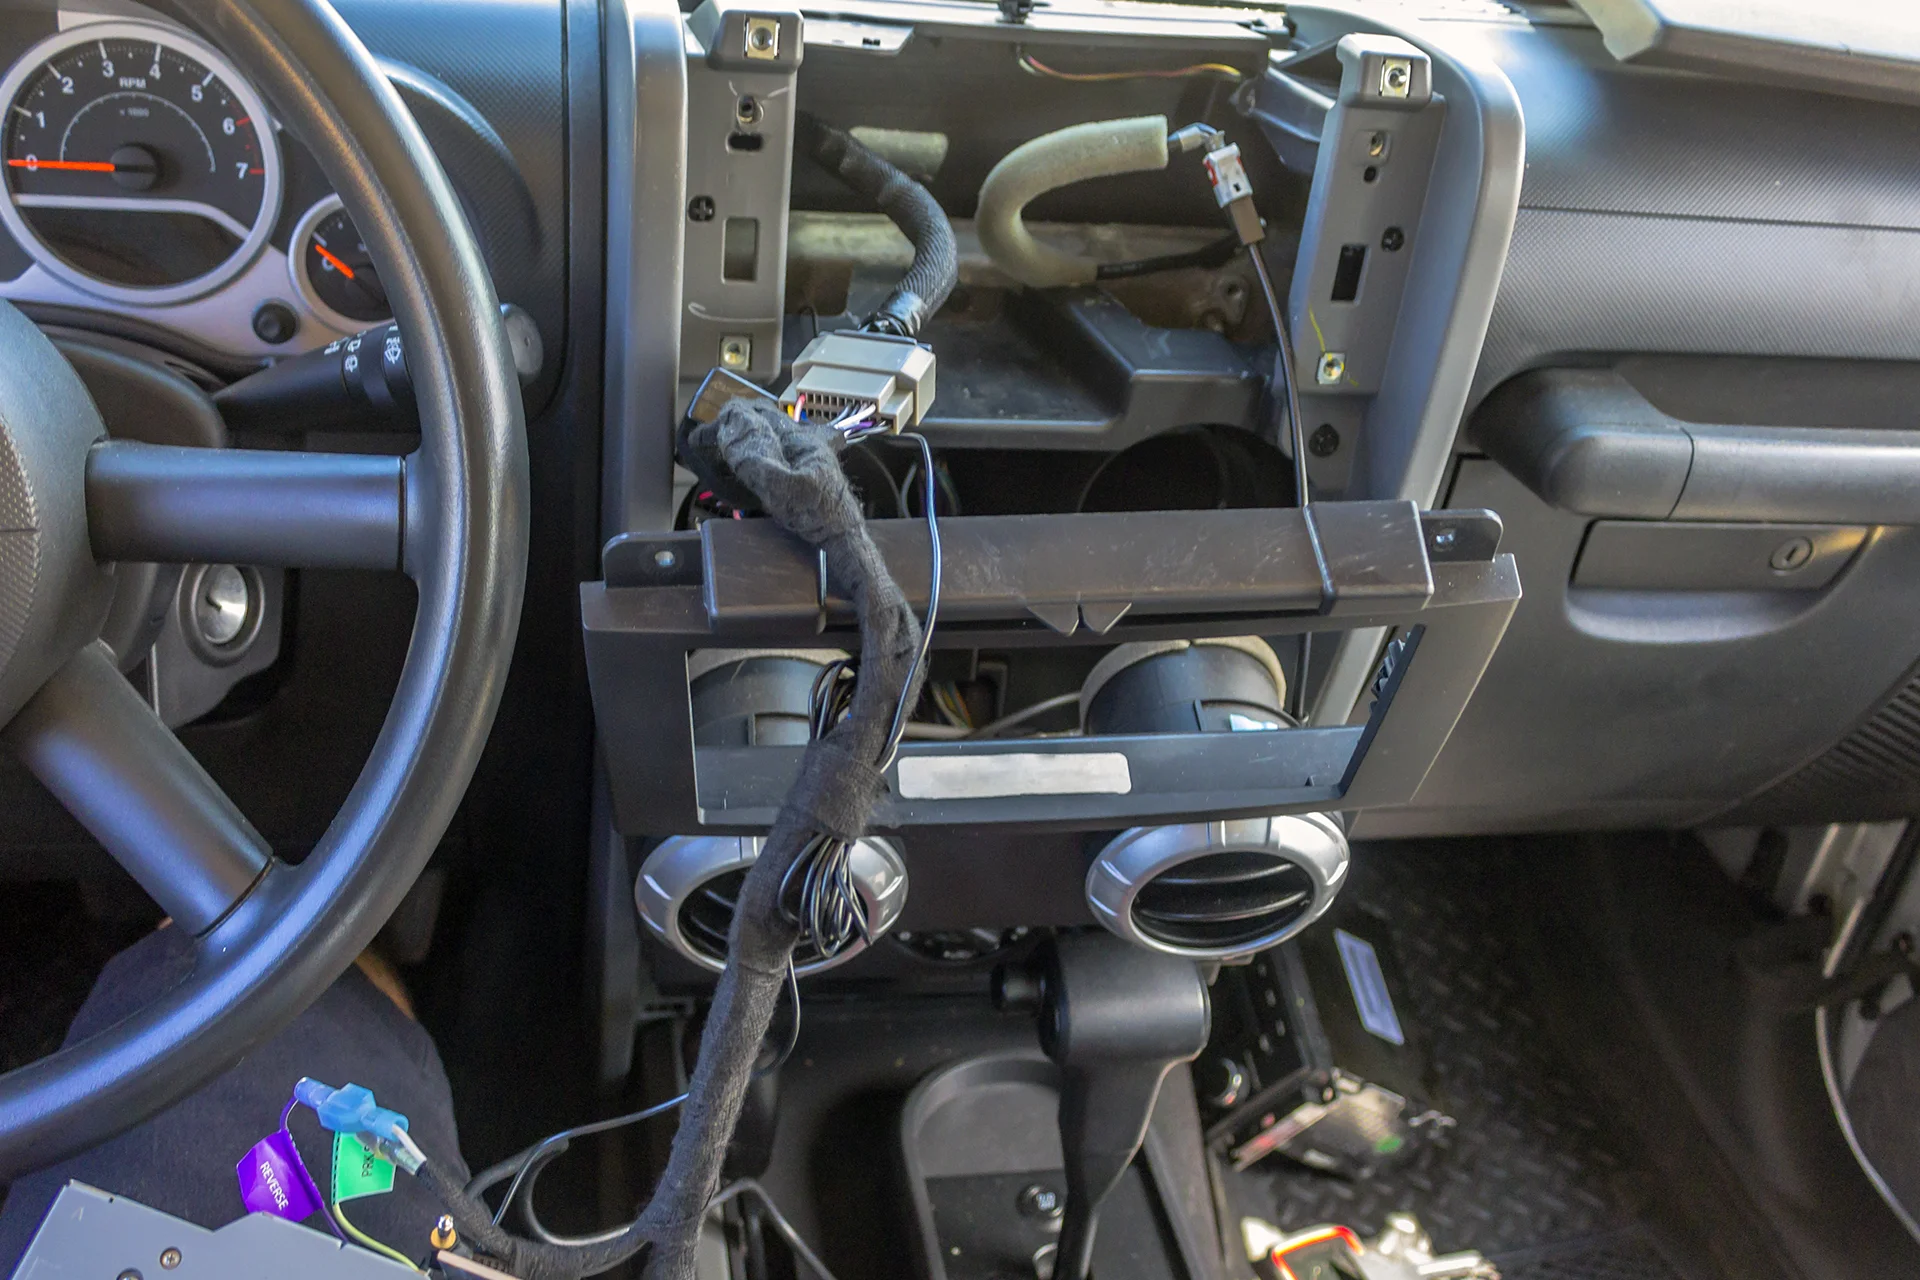
3. Slide Out The Radio
Gently pull the radio unit toward you. It may feel snug because of the wiring harness behind it. Do not yank the unit—wiggle it a bit if needed.
Hidden detail: Some models have a tab at the back or extra screws securing the radio. If it doesn’t budge, double-check for missed fasteners.
4. Disconnect Wiring
On the back, you’ll find several connectors:
- Main power and speaker harness
- Antenna cable
- Optional: USB, satellite radio, or backup camera wires
Press the release tabs on each connector and pull them out gently. If a connector is stuck, check for a small lock tab you need to press in.
5. Remove The Unit
Once all wires are disconnected, you can fully remove the radio.
Pro tip: If you plan to install a new radio, compare the wiring harness and mounting brackets before discarding the old unit.

Differences Between Wrangler Model Years
Not all Jeep Wranglers have the same radio removal process. Here’s a quick comparison:
| Model Year | Trim Removal Complexity | Typical Screw Size | Extra Steps |
|---|---|---|---|
| JK (2007–2018) | Moderate | 7mm | One-piece trim |
| JL (2018+) | Higher | 7mm/10mm | Climate panel removal |
| TJ (1997–2006) | Low | Phillips | Minimal clips |
Tip for beginners: The JL dash is more delicate. Protect surfaces with a towel and avoid sharp tools.
Common Problems And How To Avoid Them
Many first-timers encounter a few avoidable issues:
- Breaking dash clips: Use gentle pressure and proper trim tools.
- Losing screws: Keep a small container nearby.
- Forgetting wiring order: Take photos before disconnecting anything.
- Radio stuck: Double-check for hidden screws or tabs.
- Battery not disconnected: This can trigger airbag or electrical faults.
If you damage a clip, replacements are available online or at Jeep dealers.

After Radio Removal: Next Steps
If you’re installing a new stereo, you’ll usually need an adapter harness to match your Jeep’s wiring. Some upgrades, like touchscreen units or Apple CarPlay, require extra steps:
- Install microphone for hands-free calls
- Connect steering wheel controls (with special adapters)
- Update dash trim if the new unit is a different size
Here’s a quick look at wiring adapters for different Wrangler generations:
| Model | Main Harness Needed | Steering Wheel Adapter |
|---|---|---|
| JK | YES | Optional |
| JL | YES | YES |
| TJ | YES | No |
Non-obvious insight: Some JL Wranglers use active noise cancellation. Unplugging the factory radio may affect this system. If you hear new cabin noise after installation, consult your manual or a Jeep forum.
Safety And Legal Considerations
Always disconnect your car battery before starting. Accidentally tripping the airbag system can be dangerous and expensive. If your Wrangler is under warranty, check if radio removal affects coverage.
In some states, tampering with emissions or safety devices (like backup cameras) can cause inspection issues. Make sure your new radio supports all original safety features.
Professional Help Vs. Diy
You don’t always need a professional for this job. However, if you’re uncomfortable with dash disassembly or complex wiring, consider a car audio shop. The average labor cost for radio removal and installation in the US is $70–$150. Sometimes, paying for expertise saves time and avoids damage.
Frequently Asked Questions
How Long Does It Take To Remove A Jeep Wrangler Radio?
For most people, the process takes 30–60 minutes. First-timers should allow extra time to avoid rushing. Removing trim carefully is the most time-consuming step.
Can I Put The Old Radio Back If I Change My Mind?
Yes, you can reinstall the factory radio. Just keep all screws, clips, and wiring harnesses. Take photos during removal to help with reassembly.
Do I Need Special Tools To Remove The Radio?
Usually, only basic tools are required: a trim tool, screwdriver, and socket wrench. Specialty radio removal keys are not needed for most Jeep models.
Will Removing The Radio Affect My Jeep’s Warranty?
It can, especially if you damage wiring or connected electronics. Always check your owner’s manual or ask your dealer before starting.
Where Can I Find More Help Or Guides For My Model?
The official Jeep website has manuals, and many Jeep forums have detailed step-by-step guides with photos for every model year.
Removing a Jeep Wrangler radio is a manageable project for most DIYers. With the right tools, patience, and attention to detail, you can complete the job safely and get your Wrangler ready for a modern upgrade or repair. If you’re unsure about any step, don’t hesitate to ask in a Jeep community or consult a professional.