Replacing a Jeep Patriot tail light is a practical task you can do yourself, even if you have little experience with car repairs. A broken or dim tail light not only risks your safety but can also lead to expensive traffic tickets. The good news is, with the right tools and a bit of patience, you can change the tail light in under 30 minutes. Let’s break down the process so you can feel confident, avoid common mistakes, and keep your Patriot safe and legal on the road.
Why Replace Your Jeep Patriot Tail Light?
A working tail light is essential for being seen at night, in fog, or during heavy rain. If your tail light is not functioning, drivers behind you may not notice when you stop or slow down. This can lead to accidents.
Also, US law requires vehicles to have fully functioning tail lights at all times.
Most Jeep Patriot tail lights use standard bulbs, but some models come with LED units. The replacement steps are similar, but always check your owner’s manual for specific details.
Tools And Parts You Need
Before you start, gather these tools:
- Phillips head screwdriver or socket wrench (8mm usually fits)
- Replacement tail light bulb or tail light assembly (check fit for your model year)
- Gloves (to keep oils off the bulb)
- Clean cloth
For most Jeep Patriots (model years 2007–2017), the tail light bulb type is 3157 for brake/turn signals and 194 for side markers. Verify by checking your old bulb or the manual.

Step-by-step: How To Replace The Tail Light
Follow these steps to safely and correctly replace your Jeep Patriot tail light:
1. Open The Rear Hatch
Lift the rear hatch to access the tail light assembly. Make sure the vehicle is off and parked safely.
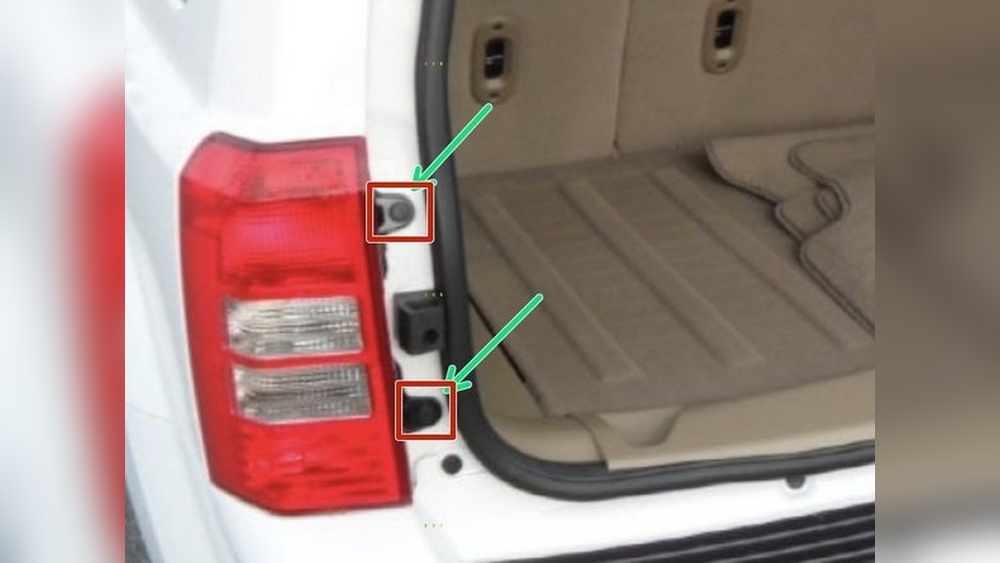
2. Remove Tail Light Screws
Locate the screws on the inside edge of the tail light assembly. Use a screwdriver or socket wrench to remove them. Keep the screws safe.
3. Gently Pull Out The Tail Light Assembly
Grip the assembly and pull it straight out. You may feel some resistance due to retaining clips. Wiggle gently to avoid breaking them.
4. Disconnect The Electrical Connector
Find the connector at the back of the assembly. Press the tab and pull to unplug it.
- Replace the Bulb or Assembly
- If changing the bulb: Twist the bulb socket counterclockwise to remove it. Pull out the old bulb, insert the new one, and twist the socket back in.
- If replacing the whole assembly: Align the new unit, plug in the connector, and position it back.
- Reattach the Assembly
Push the tail light back into place, making sure clips engage. Reinstall the screws.
7. Test The Tail Light
Turn on your vehicle and check all tail light functions—brake, turn, and reverse lights. If something is not working, check the bulb orientation or connector.
Quick Reference: Tools And Bulb Types
| Tool/Part | Purpose | Notes |
|---|---|---|
| Phillips Screwdriver/Socket Wrench | Remove screws | 8mm socket fits most |
| 3157 Bulb | Brake/Turn light | Fits most Patriots |
| 194 Bulb | Side marker | Small wedge bulb |
| Gloves | Protect bulb from oil | Wear during installation |
Common Mistakes To Avoid
- Touching the new bulb with bare hands: Oils from your skin can shorten the bulb’s life.
- Forgetting to test the light: Always check all functions before closing up.
- Losing screws or damaging clips: Work slowly and store removed parts safely.

When To Replace The Whole Assembly
Sometimes, replacing just the bulb isn’t enough. Here’s when you might need a full tail light assembly:
- Cracked or broken lens (lets water in)
- Burnt internal wiring or melted sockets
- Cloudy or faded lens that can’t be polished
Full assemblies are more expensive but simple to install. You can find them at auto parts stores or online.
Example: Bulb Vs. Assembly Costs
| Part | Average Cost (USD) | Replacement Difficulty |
|---|---|---|
| 3157 Bulb | $3 – $8 | Easy |
| Tail Light Assembly | $60 – $150 | Moderate |
Additional Tips
- Buy OEM parts for best fit and performance. Aftermarket parts can be cheaper but may not align perfectly.
- Keep spare bulbs in your glove box—especially if you drive long distances.
- If your tail light fails soon after replacement, check for fuse issues or wiring problems.
- Some Patriot models have a small plastic cover hiding the screws. Pry it off gently with a flat tool.
Jeep Patriot Tail Light Lifespan
Most tail light bulbs last 4–6 years under normal use. LED units can last over 10 years, but the whole assembly must be replaced if one LED fails. Driving often in rough conditions or extreme weather can reduce lifespan.
Typical Tail Light Failure Symptoms
| Symptom | Possible Cause |
|---|---|
| One side is out | Burnt bulb |
| Both sides out | Blown fuse |
| Water in assembly | Cracked lens |
| Dim light | Old bulb or bad ground |
Frequently Asked Questions
How Do I Know Which Tail Light Bulb To Buy For My Jeep Patriot?
Check your owner’s manual or remove the old bulb and look for the part number. Most Jeep Patriots use 3157 bulbs for brake and turn signal lights.
Can I Replace The Tail Light If I Have No Car Repair Experience?
Yes, this is a beginner-friendly task. Just follow each step, use the right tools, and take your time.
What Should I Do If The New Tail Light Still Doesn’t Work?
Double-check the bulb orientation and connectors. If it’s still not working, check the fuse box—the tail light fuse may be blown.
Is It Legal To Drive With A Broken Tail Light?
No, it is illegal and unsafe. Police can ticket you, and it increases your risk of being rear-ended.
Where Can I Find More Details Or Get Help?
For more technical details, you can visit the official NHTSA Lighting Requirements page.
Replacing your Jeep Patriot tail light is a quick way to keep your car safe and street-legal. With the right parts and clear steps, you’ll save money and avoid unnecessary headaches. If in doubt, ask a mechanic, but most owners find this repair easy and rewarding.