Changing a blinker bulb is a common car maintenance task, but many drivers feel unsure about doing it themselves. If your turn signal is flashing faster than usual, or not working at all, the bulb may need replacement. This guide will help you change your blinker bulb safely, save money, and avoid a ticket.
You don’t need to be a mechanic—just follow these steps and tips.
Understanding Blinker Bulbs
Blinker bulbs, also called turn signal bulbs, are essential for safe driving. They help communicate your intentions to other drivers. Blinker bulbs can last from 2 to 6 years, depending on the type and how often you use them. Most cars use either incandescent or LED bulbs. Incandescent bulbs are cheaper but burn out faster. LEDs last longer but cost more upfront.

| Bulb Type | Average Lifespan | Cost Range |
|---|---|---|
| Incandescent | 2-4 years | $2-$8 |
| LED | 5-10 years | $10-$25 |
Some cars use separate bulbs for front and rear blinkers. Always check your vehicle’s manual for the correct bulb type and location.
Tools And Materials You Need
Before starting, gather the following:
- Replacement blinker bulb (check owner’s manual for correct size)
- Flathead or Phillips screwdriver
- Gloves (optional, to protect the bulb and your hands)
- Rag or towel
- Owner’s manual (for reference)
You usually don’t need special tools, but some models may require a socket wrench or trim removal tool.

Step-by-step Guide To Changing A Blinker Bulb
The process can differ based on your car’s make and model. However, these general steps apply to most vehicles.
1. Turn Off The Car And Lights
Always switch off the ignition and all lights. This prevents electrical shock and protects the new bulb.
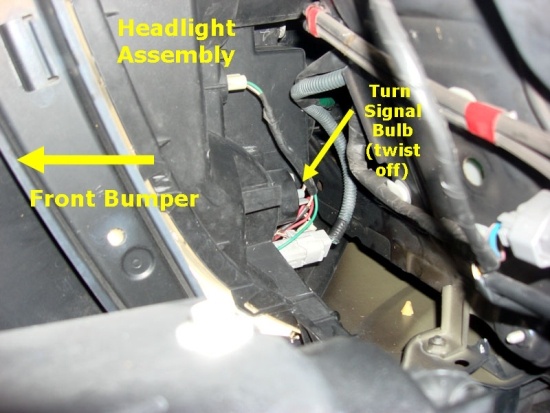
2. Locate The Blinker Bulb
Front blinker bulbs are usually in the headlight assembly. Rear blinker bulbs are in the taillight assembly. Open the hood or trunk, depending on which bulb you’re replacing.
3. Access The Bulb Assembly
Most vehicles let you reach the bulb from behind the assembly. You may need to:
- Remove screws or clips holding the assembly in place.
- Slide out the assembly gently.
Some cars require removing the entire headlight or taillight unit. Refer to your manual for guidance.
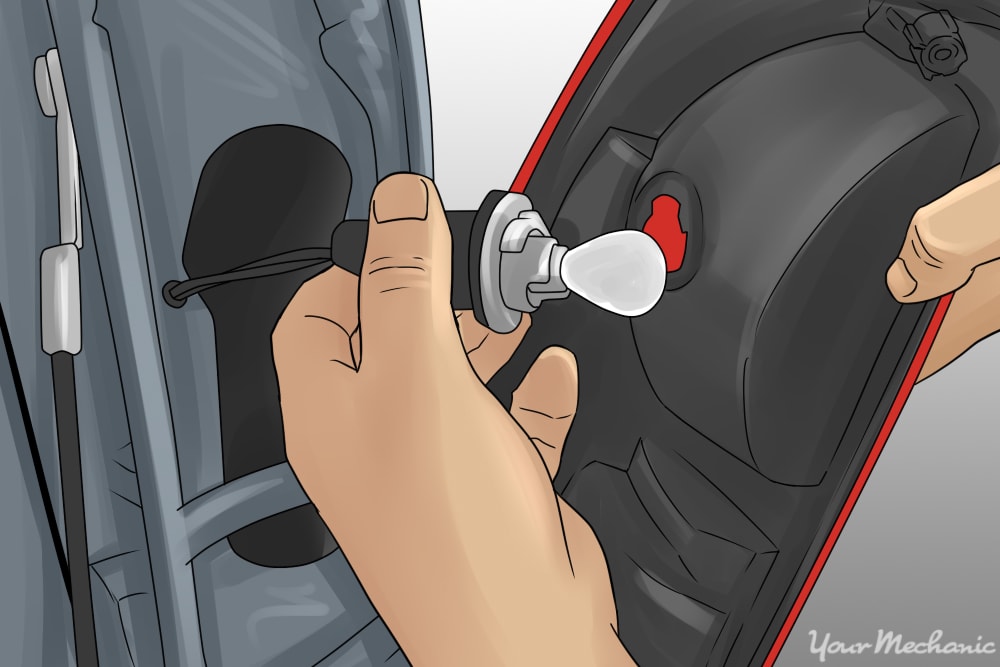
4. Remove The Old Bulb
- Twist the bulb socket counterclockwise to unlock it.
- Pull the socket out carefully.
- Remove the old bulb by pulling it straight out or twisting, depending on the type.
Insight: Some cars use a dual-filament bulb for both brake and blinker. Make sure you identify the correct one before removing.
5. Install The New Bulb
- Hold the new bulb with a clean rag or gloves to avoid oil from your fingers.
- Insert the new bulb into the socket firmly.
- Re-insert the socket into the assembly and twist clockwise to lock.
6. Test The Blinker
Before reassembling everything, turn on your car and test the new blinker bulb. Make sure it flashes at the normal speed and brightness.
7. Reassemble And Secure
Once the bulb works, put the assembly back in place. Tighten any screws or clips you removed.
Common Mistakes To Avoid
- Touching the glass of the new bulb with bare hands can cause it to burn out faster.
- Installing the wrong bulb type or size—always double-check the part number.
- Forgetting to test the bulb before reassembling.
- Forcing the assembly back—align all clips or tabs carefully to prevent breakage.
Signs Your Blinker Bulb Needs Replacement
- Rapid blinking when using turn signals
- Blinker indicator stays on but doesn’t flash
- One blinker works but the other doesn’t
- No sound or clicking from the relay
If you notice any of these, inspect your bulbs soon.
When To Seek Professional Help
Most blinker bulbs are easy to change. However, some modern cars require removing complex panels or use sealed LED assemblies. If you can’t access the bulb easily, or feel unsure, a mechanic can help. Many auto parts stores also offer free installation when you buy a bulb from them.
Example: Changing A Front Blinker Bulb On A Toyota Camry
- Open the hood and locate the headlight assembly.
- Find the blinker bulb socket (usually amber-colored).
- Twist the socket counterclockwise and pull it out.
- Remove the old bulb and insert the new one.
- Test the signal, then reinsert the socket and close the hood.
This process takes about 10-20 minutes for most cars.
Cost Comparison: Diy Vs Professional Replacement
Here’s a comparison of typical costs for changing a blinker bulb yourself versus at a shop.
| Method | Parts Cost | Labor Cost | Total |
|---|---|---|---|
| DIY | $2-$25 | $0 | $2-$25 |
| Professional | $2-$25 | $20-$60 | $22-$85 |
DIY saves money and time, but professional service can be helpful for difficult-to-reach bulbs.
Two Key Insights Most Beginners Miss
First, check both sides: If one bulb is out, the other may soon fail too. Consider replacing both at the same time for convenience.
Second, test the fuse if the new bulb doesn’t work. Sometimes, the issue is a blown fuse or faulty relay, not the bulb itself. Your owner’s manual will show fuse locations.
Where To Find The Right Bulb
Buy replacement bulbs at auto parts stores, big-box retailers, or online. Use your vehicle’s year, make, and model to match the bulb. If unsure, ask store staff or check your manual.
For more details on car light maintenance, see this NHTSA lighting safety guide.
Frequently Asked Questions
How Do I Know Which Blinker Bulb To Buy?
Check your owner’s manual for the correct bulb number or ask at an auto parts store. The staff can look up your car model and provide the exact part.
Can I Change A Blinker Bulb Without Tools?
Many cars allow tool-free access, but some require a screwdriver or socket wrench. Always check your car before starting.
Why Is My Turn Signal Blinking Fast After Changing The Bulb?
A fast blink usually means a bulb is burned out, loose, or the wrong type was installed. Double-check your installation and bulb compatibility.
Do Led Bulbs Work As Blinker Replacements?
Yes, but they may need a resistor to prevent hyper-flashing. Some vehicles require a special LED-compatible relay.
Is It Legal To Drive With A Broken Blinker Bulb?
No. Driving with a non-working turn signal is unsafe and can lead to fines. Replace the bulb as soon as possible.
Changing your blinker bulb is a simple way to keep your car safe and legal. With a few tools and careful steps, you can do it yourself and avoid extra repair costs. If you ever feel uncertain, don’t hesitate to ask for help—safety always comes first.