Replacing the headlight in your Jeep Grand Cherokee might seem difficult, but with some guidance, you can do it yourself in less than an hour. Whether your light is dim, burnt out, or damaged, swapping it out improves visibility and safety. This guide will show you how to replace the headlight step by step, with practical tips for both beginners and experienced car owners.
Understanding Jeep Grand Cherokee Headlights
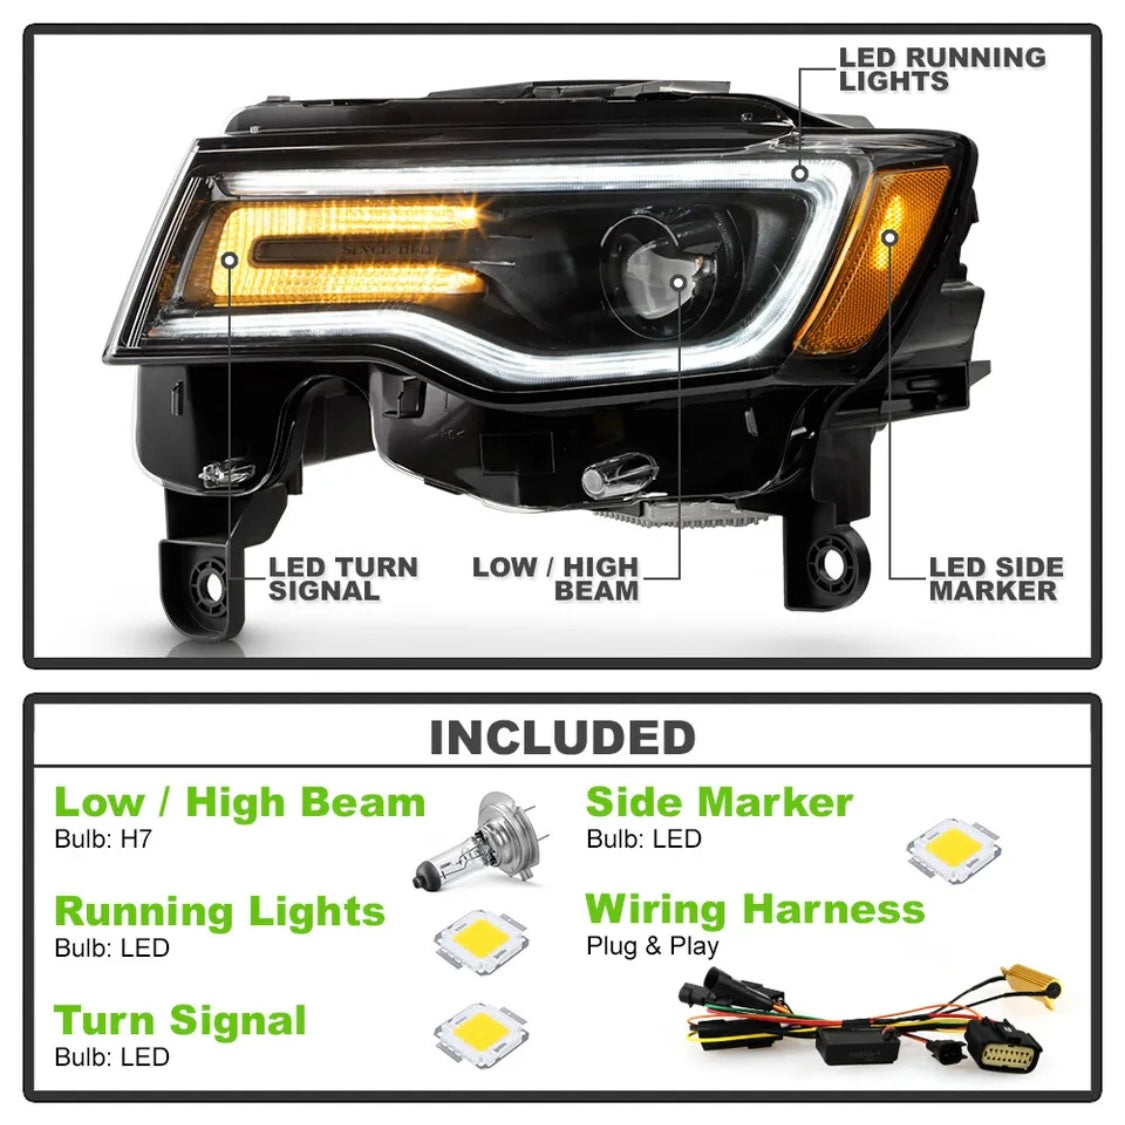
The Jeep Grand Cherokee uses different headlight types depending on the model year. Most models from 2011 onwards use halogen or HID bulbs, while newer versions may use LED assemblies. Before buying a replacement, check your owner’s manual or the old bulb for the correct type and wattage.
Here’s a quick comparison of common headlight bulb types used in Jeep Grand Cherokees:

| Bulb Type | Brightness (Lumens) | Average Lifespan (Hours) | Cost Range (USD) |
|---|---|---|---|
| Halogen | 700-1,200 | 450-1,000 | $12-$25 |
| HID | 2,000-3,500 | 2,000-3,000 | $35-$90 |
| LED | 2,000-4,000 | 10,000-30,000 | $40-$120 |
It’s important to choose the right bulb for your vehicle’s year and trim. Using the wrong bulb can cause electrical issues or poor light performance.
Tools And Materials Needed
Before starting, gather the following:
- Replacement headlight bulb (check your manual for the exact type)
- Phillips screwdriver
- Flathead screwdriver (optional)
- Gloves (to prevent oil from your skin damaging the bulb)
- Socket wrench (for some models)
- Clean cloth
Some newer Grand Cherokees may require removing parts of the grille or trim to access the headlight assembly. Having the right tools ready avoids delays.
Step-by-step Headlight Replacement Guide
Follow these steps carefully to replace your Jeep Grand Cherokee headlight safely and effectively.
1. Preparation
- Park your vehicle on a flat surface and turn off the engine.
- Disconnect the battery by removing the negative terminal. This prevents electrical shocks and protects sensitive electronics.
- Open the hood and locate the headlight assembly.
2. Accessing The Headlight
Depending on your model, you may need to remove the air intake cover or grille. For 2014–2022 models, the headlight is usually accessible without removing the bumper.
- Unscrew any bolts or clips holding the headlight assembly.
- Gently pull the assembly forward. Don’t force it—some models have hidden fasteners.
3. Removing The Old Bulb
- Find the bulb socket behind the headlight.
- Turn the bulb socket counterclockwise to unlock it.
- Carefully pull out the bulb.
Tip: If your bulb is stuck, wiggle it gently. Avoid using too much force or you may crack the housing.
4. Installing The New Bulb
- Wear gloves to handle the new bulb. Oil from your fingers can shorten its lifespan.
- Insert the bulb into the socket and turn it clockwise to lock.
- Reconnect the wiring harness securely.
5. Reassembling And Testing
- Slide the headlight assembly back into place and tighten the bolts or clips.
- Reconnect the battery.
- Turn on your headlights and check both low and high beams.
If the bulb doesn’t light up, double-check the wiring and socket. Sometimes, improper installation or loose connectors cause issues.
Common Mistakes And How To Avoid Them
Many first-time DIYers make simple mistakes. Here are some you should avoid:
- Touching the bulb glass with bare hands: Always use gloves to prevent oil residue, which can cause bulbs to burn out quickly.
- Forcing the assembly: If it doesn’t move easily, check for hidden screws or clips.
- Skipping battery disconnection: This increases the risk of electrical shocks and damage.
- Using the wrong bulb type: Double-check specifications before buying.
- Ignoring alignment: After installation, make sure the beam is aimed correctly. Misaligned headlights can reduce visibility and blind other drivers.

Comparing Diy Vs Professional Replacement
Let’s look at the cost and time differences between replacing the headlight yourself and hiring a professional.
| Method | Average Cost (USD) | Time Required | Skill Needed |
|---|---|---|---|
| DIY | $20-$120 | 30-60 minutes | Basic |
| Professional | $100-$300 | 15-30 minutes | None |
DIY saves money but requires patience and care. Professionals work faster and guarantee proper installation, but at a higher cost.
Practical Tips For A Smooth Replacement
- Check both headlights: If one bulb is out, the other may fail soon. Replacing both together saves time.
- Keep spare bulbs in your glove compartment. This helps during night emergencies.
- Inspect wiring while replacing. Damaged wires can cause flickering or failure.
- Use quality bulbs: Cheap bulbs often have shorter lifespans and lower brightness.
Many beginners overlook these details, leading to repeat repairs. Taking your time and following each step prevents future problems.
Frequently Asked Questions
How Do I Know Which Bulb To Buy For My Jeep Grand Cherokee?
Check your owner’s manual or look on the old bulb for the part number. Most models use H11, 9005, or D3S bulbs, but always confirm before buying.
Is It Safe To Replace Headlights Myself?
Yes, if you follow safety steps like disconnecting the battery and wearing gloves. Avoid rushing, and check your work before driving.
Can I Upgrade To Led Headlights?
You can upgrade, but make sure the LED kit is compatible with your model. Some upgrades need extra wiring or adapters. Always check local laws about headlight modifications.
Why Do My New Headlights Look Dim?
This can happen if the bulb is not seated correctly, or if the lens is dirty or cloudy. Clean the headlight lens and recheck the installation.
Do I Need To Realign My Headlights After Replacement?
If the assembly was moved, yes. Improper alignment can cause poor visibility and glare for other drivers. Follow your manual’s instructions for adjusting the beam.
Replacing your Jeep Grand Cherokee headlight is easier than many people think. With the right tools and a careful approach, you can improve your car’s safety and appearance without a trip to the mechanic. If you want more detailed model-specific instructions, visit the official Jeep site at Jeep.com.