Adjusting the shift linkage on a 4L60E transmission can solve problems like hard shifting, gear selection errors, or even the inability to shift into certain gears. Many car owners struggle with this, especially after transmission repairs or when installing a new shifter. If you want smoother gear changes and reliable performance, learning how to adjust the linkage correctly is essential. This guide walks you through the process step by step, explains common mistakes, and shares useful tips that even experienced mechanics sometimes overlook.
Understanding Shift Linkage On 4l60e
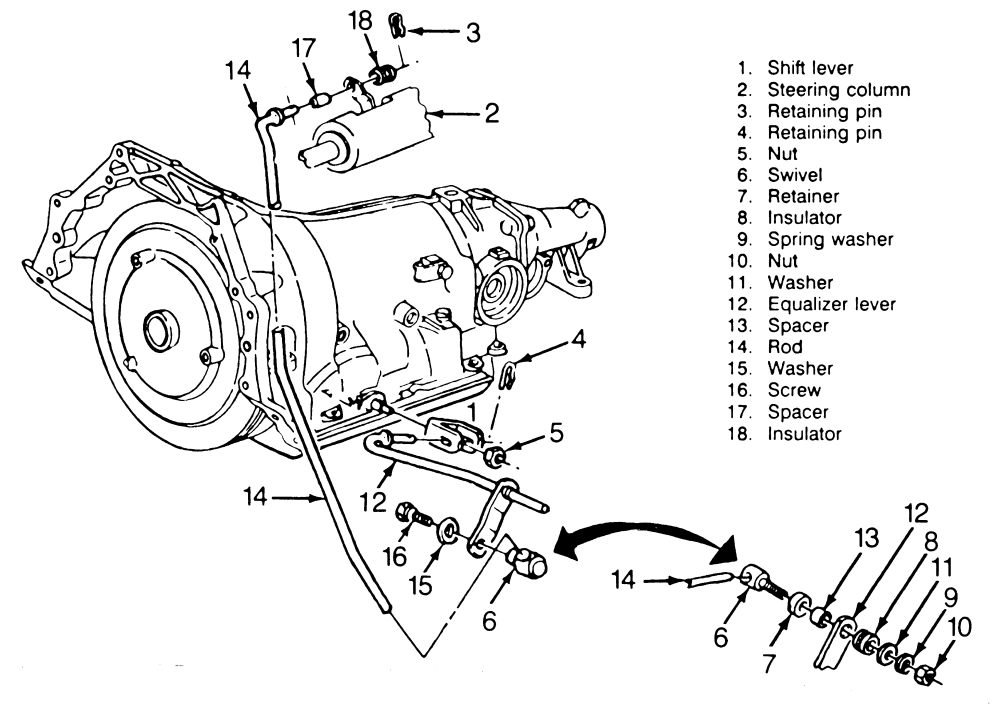
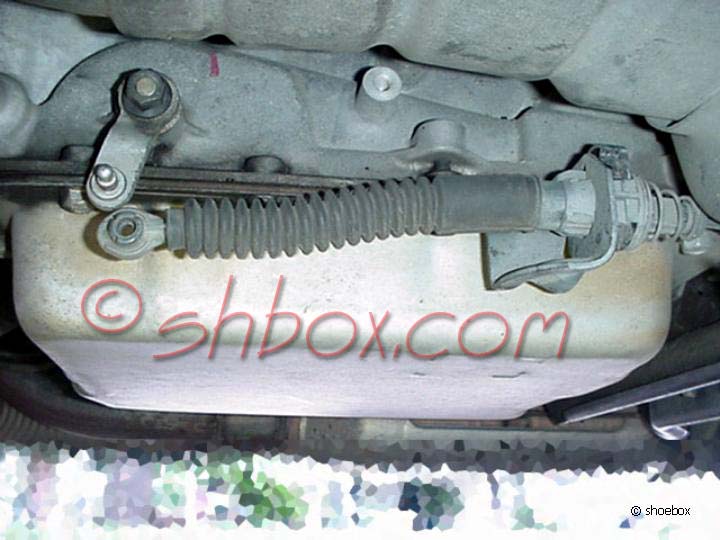
The shift linkage connects your gear shifter to the transmission. On the 4L60E—a popular automatic transmission in many GM vehicles—it ensures the shifter matches the gear selected inside the transmission. Misalignment can cause symptoms like not being able to reach “Park” or “Drive,” or the indicator showing the wrong gear.
Here’s a quick look at why proper adjustment matters:
| Problem | Possible Cause | Result |
|---|---|---|
| Hard shifting | Linkage misaligned | Erratic gear changes |
| Gear mismatch | Loose linkage | Wrong gear indicator |
| No “Park” or “Reverse” | Linkage too tight or loose | Safety risk |
Tools And Preparation
Before you start, gather these tools:
- Wrench set (usually 13mm or 15mm)
- Screwdriver
- Jack and jack stands
- Safety glasses
- Work gloves
Make sure your vehicle is parked on a flat surface, with the parking brake engaged. Always use jack stands, not just a jack, to prevent accidents.
Step-by-step Adjustment Process
1. Locate The Shift Linkage
The shift linkage is underneath the vehicle, attached to the side of the transmission. Look for a rod connecting the shifter to the transmission shift lever. If unsure, check your owner’s manual or a reliable repair manual.
2. Inspect For Wear
Before adjusting, check for worn bushings or bent rods. These parts can cause shifting issues even if the linkage is correctly adjusted. If you find damaged parts, replace them first.
3. Set The Transmission To Neutral
Inside the vehicle, move the shifter to the Neutral position. This step aligns both the shifter and the transmission, making adjustment easier and safer.
4. Loosen The Linkage Bolts
Under the vehicle, locate the nut or bolt securing the shift linkage. Loosen it, but do not remove it completely. This allows you to move the linkage freely.
5. Align The Shift Lever
Move the transmission shift lever by hand to the Neutral position. This is usually the middle setting. Make sure the lever clicks into place.
6. Adjust And Tighten
Slide the linkage rod so it fits perfectly with the transmission shift lever. Once aligned, tighten the bolt or nut securely. Do not overtighten, as this could damage the linkage or make shifting stiff.
7. Test Gear Selection
Return to the vehicle and cycle through all gears—Park, Reverse, Neutral, Drive, Low. Make sure the indicator matches the gear and that each gear engages smoothly. If there’s any mismatch, repeat the steps above.
8. Final Check
With the engine running and your foot on the brake, shift through all gears again. Listen for unusual noises or feel for resistance. If everything works smoothly, you’re finished.
Common Mistakes And Solutions
Even skilled mechanics sometimes make mistakes during shift linkage adjustment. Here are two non-obvious issues to watch for:
- Ignoring worn bushings: Even if the linkage is perfectly aligned, worn bushings can cause sloppy shifting. Replace all bushings before adjusting.
- Skipping gear cycling: Many people only check “Park” and “Drive.” Always cycle through every gear after adjustment to catch hidden issues.
Another tip: Avoid adjusting the linkage when the vehicle is not in Neutral. This can misalign the shifter and transmission, leading to gear selection problems.

Signs Your Shift Linkage Needs Adjustment
If you notice any of these signs, your 4L60E shift linkage may need adjustment:
- Gear indicator doesn’t match the actual gear
- Difficulty shifting into Park or Reverse
- Transmission doesn’t engage certain gears
- Shifter feels loose or sloppy
- Vehicle rolls when in “Park”
Comparison: Proper Vs Improper Linkage Adjustment
To better understand the impact, here’s a comparison:
| Adjustment | Gear Selection | Safety | Performance |
|---|---|---|---|
| Proper | Accurate | High | Smooth shifting |
| Improper | Erratic | Low | Hard shifting |
When To Seek Professional Help
While adjusting shift linkage on a 4L60E is a task many car owners can do, there are times when calling a mechanic is wise:
- If you notice excessive play in the shifter
- If you cannot align gears after adjustment
- If the transmission makes strange noises
- After an accident or major transmission repair
Professional mechanics have special tools and experience to diagnose deeper issues, like internal transmission faults or electronic shift problems.
Expert Tips For Lasting Results
- Use a service manual for your vehicle’s specific model, as linkage designs can vary
- Lubricate all moving parts after adjustment to prevent future wear
- Check linkage adjustment every 12 months, especially if you drive off-road or tow heavy loads
- Keep a record of adjustments for future reference
For deeper information, you can read trusted resources like the GM Transmission Service Guide.
Frequently Asked Questions
What Causes Shift Linkage Misalignment On 4l60e?
Shift linkage misalignment usually happens after transmission repairs, shifter replacements, or accidental impacts under the vehicle. Worn bushings or rods can also cause misalignment over time.
Can I Adjust The Shift Linkage Without Lifting The Car?
It’s possible on some vehicles, but most need to be lifted for safe access. Always use jack stands and follow safety precautions.
How Often Should Shift Linkage Be Checked?
Check the linkage every 12 months or after any transmission-related work. Regular inspection prevents shifting issues and improves safety.
Is Shift Linkage Adjustment Expensive At A Shop?
A basic linkage adjustment at a shop usually costs $50–$150, depending on labor rates and local prices. If parts are worn, costs can increase.
Will Improper Adjustment Damage My Transmission?
Improper adjustment can cause hard shifting, gear mismatch, or failure to engage “Park.” Over time, this stresses internal parts and may lead to transmission damage.
Adjusting the shift linkage on your 4L60E transmission is a straightforward task that can make a big difference in how your car shifts. With careful attention, the right tools, and regular checks, you’ll enjoy smooth gear changes and improved safety. Don’t forget to watch for worn parts and always test every gear after adjustment. This simple maintenance step can save you time, money, and headaches down the road.